Important NoteThis entire repo was AI created - including all of the data within. The intent was to A) help me with my personal electronics inventory; and B) see how I could use AI to make that process a bit easier. DO NOT TRUST!
Adafruit CLUE - nRF52840 Express with Bluetooth LE
Overview
The Adafruit CLUE is a sensor-packed development board designed for projects that require extensive environmental monitoring and wireless connectivity. Built around the Nordic nRF52840 Bluetooth LE processor and featuring a comprehensive sensor suite, the CLUE is perfect for IoT projects, data logging, and interactive applications that need wireless communication.
Specifications
- Microcontroller: Nordic nRF52840 Bluetooth LE processor
- Performance: 64 MHz Cortex M4 processor
- Memory: 1MB Flash + 256KB RAM
- Storage: 2MB internal flash for datalogging and code
- Display: 1.3” 240x240 Color IPS TFT
- Connectivity: Bluetooth LE 5.0
- Form Factor: BBC micro:bit compatible shape and size
- Power: 3-6V battery input with internal regulation
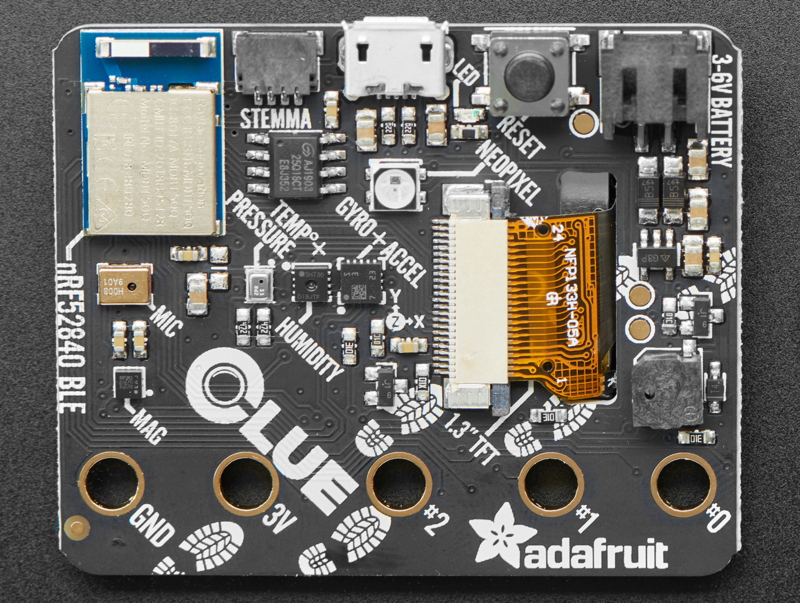
Comprehensive Sensor Suite
Motion Sensors
- LSM6DS3TR: 3-axis accelerometer and gyroscope
- LIS3MDL: 3-axis magnetometer
- Combined 9-DoF: Complete motion sensing capability
Environmental Sensors
- SHT Humidity Sensor: Accurate humidity measurement
- BMP280: Temperature and barometric pressure/altitude sensor
- APDS9960: Proximity, light, color, and gesture sensor
Audio & Light
- PDM Microphone: Digital sound sensor for audio projects
- Two Bright White LEDs: Front-facing illumination for color sensing
- RGB NeoPixel: Programmable indicator LED
Display & Interface
- 1.3” IPS TFT: 240x240 high-resolution color display
- Two User Buttons: A and B buttons for user interaction
- Reset Button: System reset functionality
- Buzzer/Speaker: Built-in audio output for tones and beeps
Connectivity & Expansion
- Bluetooth LE 5.0: Wireless communication and data transmission
- STEMMA QT/Qwiic Connector: Easy sensor and peripheral expansion
- Hardware Interfaces: SPI, UART, I2C, and I2S on any pins
- Grove Compatibility: I2C Grove sensors via adapter cable
- micro:bit Edge Connector: 5 large pads for compatibility with existing kits
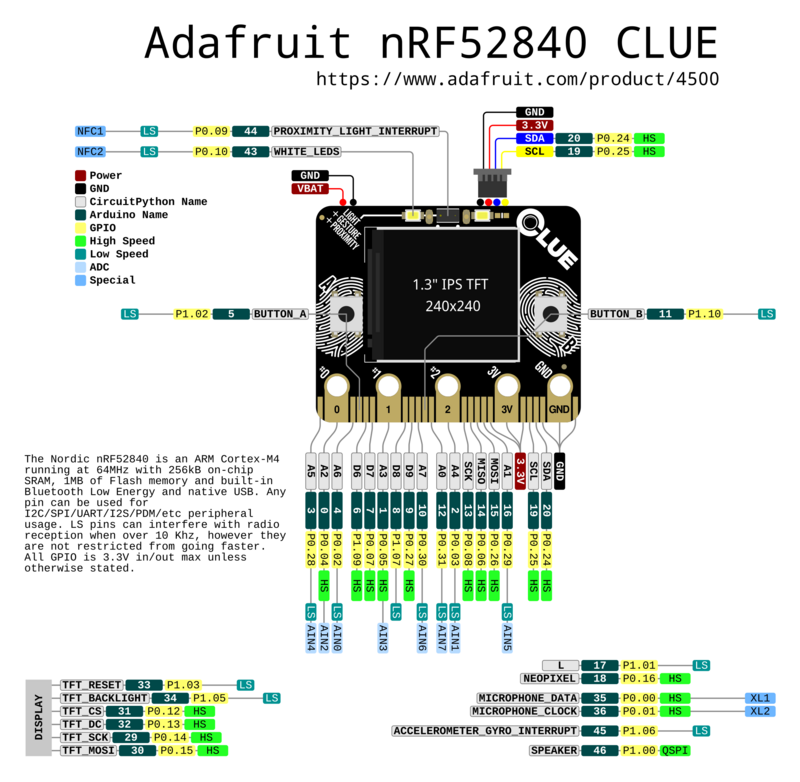
Pinout Diagrams
Official Adafruit Pinout Images
Basic Wiring Examples
External Sensor Connection (STEMMA QT)
STEMMA QT Sensor → CLUE STEMMA QT Connector
Simply plug in with STEMMA QT cable - no wiring needed!

Compatible sensors: BME280, LSM6DS33, VL53L0X, etc.
Alligator Clip Connections
External LED:
CLUE Pad 0 → LED Anode (long leg)
LED Cathode (short leg) → 220Ω Resistor → CLUE GND Pad

External Button:
CLUE 3V Pad → 10kΩ Pull-up Resistor → CLUE Pad 1
CLUE Pad 1 → Button → CLUE GND Pad

External Sensor (Analog):
Sensor Output → CLUE Pad 2 (analog input)
Sensor VCC → CLUE 3V Pad
Sensor GND → CLUE GND Pad
Battery Power Connection
Battery Pack (3V-6V) → CLUE JST PH Connector
Recommended: 3x AAA battery pack with JST connector
Note: No built-in charging - use external charger for LiPo
Micro:bit Compatibility
CLUE Edge Connector → Micro:bit Expansion Board
Compatible with most micro:bit accessories
Pin mapping matches micro:bit standard
Programming Setup Guide
CircuitPython Setup (Recommended)
- Download CircuitPython UF2 from circuitpython.org
- Double-click reset button to enter bootloader mode
- Drag UF2 file to CLUEBOOT drive
- Board reboots as CIRCUITPY drive
- Edit code.py to program
Arduino IDE Setup
- Install Arduino IDE
- Add Adafruit nRF52 boards package URL in preferences
- Install “Adafruit nRF52 by Adafruit” package
- Select “Adafruit CLUE nRF52840 Express” from Tools → Board
- Install required libraries (Adafruit_Arcada, sensor libraries)
Programming Examples
CircuitPython - Sensor Dashboard
import board
import displayio
import terminalio
from adafruit_display_text import label
from adafruit_clue import clue
import time

# Set up display
display = board.DISPLAY
splash = displayio.Group()
display.root_group = splash

# Create text labels
temp_label = label.Label(terminalio.FONT, text="Temp: --°C", color=0xFFFFFF, x=10, y=30)
humidity_label = label.Label(terminalio.FONT, text="Humidity: --%", color=0xFFFFFF, x=10, y=50)
pressure_label = label.Label(terminalio.FONT, text="Pressure: -- hPa", color=0xFFFFFF, x=10, y=70)
accel_label = label.Label(terminalio.FONT, text="Accel: X=- Y=- Z=-", color=0xFFFFFF, x=10, y=90)

splash.append(temp_label)
splash.append(humidity_label)
splash.append(pressure_label)
splash.append(accel_label)

while True:
    # Read sensors
    temperature = clue.temperature
    humidity = clue.humidity
    pressure = clue.pressure
    accel_x, accel_y, accel_z = clue.acceleration

    # Update display
    temp_label.text = f"Temp: {temperature:.1f}°C"
    humidity_label.text = f"Humidity: {humidity:.1f}%"
    pressure_label.text = f"Pressure: {pressure:.1f} hPa"
    accel_label.text = f"Accel: X={accel_x:.1f} Y={accel_y:.1f} Z={accel_z:.1f}"

    # Change NeoPixel color based on temperature
    if temperature < 20:
        clue.pixel.fill((0, 0, 255))  # Blue for cold
    elif temperature > 25:
        clue.pixel.fill((255, 0, 0))  # Red for hot
    else:
        clue.pixel.fill((0, 255, 0))  # Green for comfortable

    time.sleep(0.5)
CircuitPython - Gesture Control
import board
from adafruit_clue import clue
import time

print("CLUE Gesture Control Demo")
print("Wave your hand over the sensor!")

while True:
    gesture = clue.gesture

    if gesture == 1:  # Up
        print("Gesture: UP")
        clue.pixel.fill((255, 0, 0))  # Red
        clue.start_tone(440)  # A note
        time.sleep(0.2)
        clue.stop_tone()

    elif gesture == 2:  # Down
        print("Gesture: DOWN")
        clue.pixel.fill((0, 0, 255))  # Blue
        clue.start_tone(220)  # Lower A note
        time.sleep(0.2)
        clue.stop_tone()

    elif gesture == 3:  # Left
        print("Gesture: LEFT")
        clue.pixel.fill((0, 255, 0))  # Green
        clue.start_tone(330)  # E note
        time.sleep(0.2)
        clue.stop_tone()

    elif gesture == 4:  # Right
        print("Gesture: RIGHT")
        clue.pixel.fill((255, 255, 0))  # Yellow
        clue.start_tone(523)  # C note
        time.sleep(0.2)
        clue.stop_tone()

    else:
        clue.pixel.fill((0, 0, 0))  # Off

    time.sleep(0.1)
CircuitPython - Button and Sound
import board
from adafruit_clue import clue
import time

print("CLUE Button and Sound Demo")

while True:
    if clue.button_a:
        print("Button A pressed!")
        clue.pixel.fill((255, 0, 0))  # Red
        clue.start_tone(523)  # C note
        clue.white_leds = True  # Turn on white LEDs

    elif clue.button_b:
        print("Button B pressed!")
        clue.pixel.fill((0, 0, 255))  # Blue
        clue.start_tone(659)  # E note
        clue.white_leds = True  # Turn on white LEDs

    else:
        clue.pixel.fill((0, 0, 0))  # Off
        clue.stop_tone()
        clue.white_leds = False  # Turn off white LEDs

    time.sleep(0.1)
Arduino - Sensor Reading
#include <Adafruit_Arcada.h>
#include <Adafruit_Sensor.h>
#include <Adafruit_LSM6DS33.h>
#include <Adafruit_LIS3MDL.h>
#include <Adafruit_SHT31.h>
#include <Adafruit_BMP280.h>
#include <Adafruit_APDS9960.h>

Adafruit_Arcada arcada;
Adafruit_LSM6DS33 lsm6ds33;
Adafruit_LIS3MDL lis3mdl;
Adafruit_SHT31 sht30;
Adafruit_BMP280 bmp280;
Adafruit_APDS9960 apds9960;

void setup() {
  Serial.begin(115200);
  while (!Serial);

  if (!arcada.arcadaBegin()) {
    Serial.println("Failed to initialize Arcada");
    while (1);
  }

  // Initialize sensors
  if (!lsm6ds33.begin_I2C()) {
    Serial.println("Failed to find LSM6DS33 chip");
  }

  if (!lis3mdl.begin_I2C()) {
    Serial.println("Failed to find LIS3MDL chip");
  }

  if (!sht30.begin()) {
    Serial.println("Failed to find SHT30 chip");
  }

  if (!bmp280.begin()) {
    Serial.println("Failed to find BMP280 chip");
  }

  if (!apds9960.begin()) {
    Serial.println("Failed to find APDS9960 chip");
  }

  Serial.println("CLUE Sensor Test");
}

void loop() {
  // Read accelerometer/gyroscope
  sensors_event_t accel;
  sensors_event_t gyro;
  sensors_event_t temp;
  lsm6ds33.getEvent(&accel, &gyro, &temp);

  // Read magnetometer
  sensors_event_t mag_event;
  lis3mdl.getEvent(&mag_event);

  // Read humidity/temperature
  float humidity = sht30.readHumidity();
  float temperature = sht30.readTemperature();

  // Read pressure
  float pressure = bmp280.readPressure() / 100.0F;  // Convert to hPa

  // Read proximity
  uint8_t proximity = apds9960.readProximity();

  // Print all sensor data
  Serial.println("=== CLUE Sensor Readings ===");
  Serial.print("Accelerometer (m/s²): X=");
  Serial.print(accel.acceleration.x, 2);
  Serial.print(", Y=");
  Serial.print(accel.acceleration.y, 2);
  Serial.print(", Z=");
  Serial.println(accel.acceleration.z, 2);

  Serial.print("Gyroscope (°/s): X=");
  Serial.print(gyro.gyro.x, 2);
  Serial.print(", Y=");
  Serial.print(gyro.gyro.y, 2);
  Serial.print(", Z=");
  Serial.println(gyro.gyro.z, 2);

  Serial.print("Magnetometer (µT): X=");
  Serial.print(mag_event.magnetic.x, 2);
  Serial.print(", Y=");
  Serial.print(mag_event.magnetic.y, 2);
  Serial.print(", Z=");
  Serial.println(mag_event.magnetic.z, 2);

  Serial.print("Temperature: ");
  Serial.print(temperature, 1);
  Serial.println("°C");

  Serial.print("Humidity: ");
  Serial.print(humidity, 1);
  Serial.println("%");

  Serial.print("Pressure: ");
  Serial.print(pressure, 1);
  Serial.println(" hPa");

  Serial.print("Proximity: ");
  Serial.println(proximity);

  Serial.println("---");
  delay(2000);
}
Programming Support
Arduino IDE
- Full Arduino IDE support with Nordic nRF52 core
- Extensive sensor libraries available
- Bluetooth LE library support
- Real-time development and debugging
CircuitPython
- Native CircuitPython support
- Hardware abstraction for all sensors
- Bluetooth LE integration
- Rapid prototyping and development
Applications
IoT & Data Logging
- Environmental monitoring stations
- Wireless sensor networks
- Remote data collection
- Smart home sensors
Interactive Projects
- Gesture-controlled devices
- Motion-activated displays
- Proximity-based interactions
- Voice-activated projects
Educational & Research
- STEM education projects
- Sensor fusion experiments
- Bluetooth LE development learning
- Multi-sensor data analysis
Wearable & Portable
- Activity trackers
- Environmental badges
- Portable weather stations
- Interactive art installations
Bluetooth LE Capabilities
- Data Transmission: Send sensor data to computers or mobile devices
- Remote Control: Control the CLUE from smartphones or tablets
- Mesh Networking: Create networks of multiple CLUE devices
- Beacon Functionality: iBeacon and Eddystone support
- Low Power: Efficient wireless communication for battery projects
Power Management
- Battery Input: 3-6V battery source compatibility
- Internal Regulation: Built-in voltage regulation and protection
- Low Power Modes: Sleep modes for extended battery life
- USB Power: Direct USB operation for development
- Power Switch: On/off switch for battery conservation
micro:bit Compatibility
- Same Form Factor: Identical shape and size as BBC micro:bit
- Edge Connector: 5 large pads for existing robot kits and add-ons
- Pin Compatibility: Best effort to match edge-connector pins
- Note: Most micro:bit cases won’t fit due to component placement
Package Contents
- 1x CLUE development board (fully assembled)
- Documentation and tutorial links
- Getting started guides
Important Notes
- No MakeCode Support: Currently only Arduino and CircuitPython supported
- Case Compatibility: Most micro:bit cases won’t fit the CLUE
- Code Adaptation: micro:bit code may need adjustment for CLUE
- Battery Not Included: Requires separate battery for portable operation
- Sensor Calibration: Some sensors may require calibration for precision applications
Getting Started
- Install Arduino IDE or set up CircuitPython
- Connect via USB and test basic functionality
- Explore individual sensor readings
- Experiment with Bluetooth LE communication
- Build comprehensive sensor monitoring projects
Recommended Accessories
- 3.7V LiPoly battery or 3xAAA battery pack
- STEMMA QT sensors for expanded functionality
- Grove I2C sensors with adapter cable
- Protective case or enclosure
- Bluetooth LE development tools
Advanced Features
- Sensor Fusion: Combine multiple sensors for enhanced data
- Machine Learning: Edge AI applications with sensor data
- Wireless Mesh: Multi-device sensor networks
- Data Visualization: Real-time sensor data plotting
- Remote Monitoring: Cloud-connected sensor applications
Community & Support
- Active community with extensive tutorials
- Regular firmware and library updates
- Comprehensive documentation and examples
- Integration with popular IoT platforms
- Educational curriculum and lesson plans