Important NoteThis entire repo was AI created - including all of the data within. The intent was to A) help me with my personal electronics inventory; and B) see how I could use AI to make that process a bit easier. DO NOT TRUST!
Adafruit EdgeBadge - TensorFlow Lite for Microcontrollers
Overview
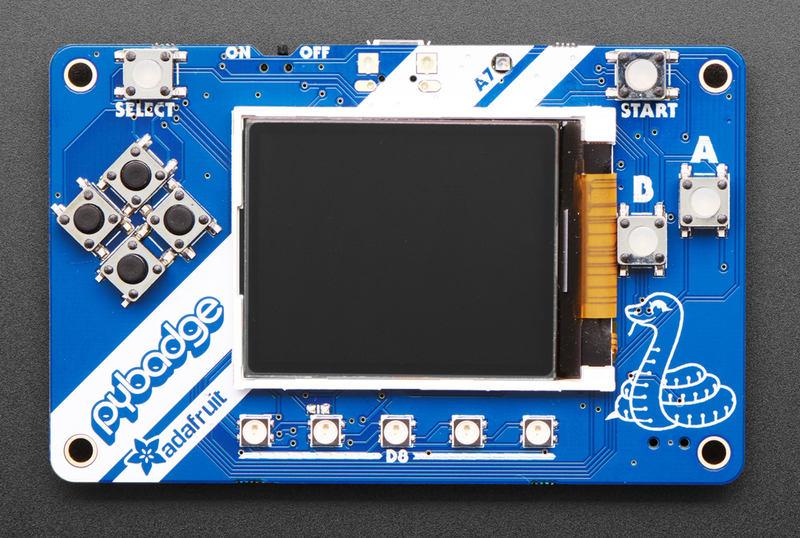
The Adafruit EdgeBadge brings machine learning to the edge with TensorFlow Lite for Microcontrollers support. Based on the popular PyBadge design but enhanced with a PDM microphone, this board enables micro speech recognition and other ML applications on a compact, credit card-sized development platform.
Specifications
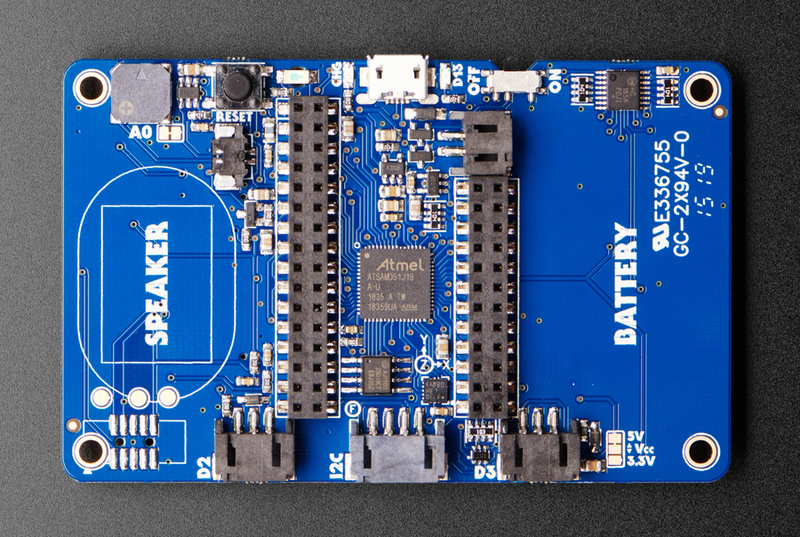
- Microcontroller: ATSAMD51J19 @ 120MHz
- Memory: 512KB Flash + 192KB RAM
- Storage: 2MB QSPI Flash for TensorFlow models and assets
- Display: 1.8” 160x128 Color TFT with dimmable backlight
- Audio Input: PDM microphone for speech recognition
- Controls: 8 game/control buttons with silicone tops
- Audio Output: Built-in buzzer + Class-D amplifier
- Connectivity: Micro USB port
- Power: LiPoly battery connector with charging circuit
Machine Learning Features
- TensorFlow Lite for Microcontrollers: Optimized ML inference engine
- PDM Microphone: High-quality digital microphone for audio ML
- Pre-trained Models: Voice recognition models (yes/no, up/down, cat/dog)
- Edge Computing: Local ML inference without cloud connectivity
- Real-time Processing: Fast inference suitable for interactive applications
- Model Storage: 2MB flash storage for TensorFlow Lite models
Built-in Hardware
Audio Processing
- PDM (Pulse Density Modulation) microphone on front panel
- High signal-to-noise ratio for clear audio capture
- Optimized for speech recognition applications
- Built-in buzzer for audio feedback
- Class-D amplifier for external speakers (up to 2W)
Display & Interface
- 1.8” TFT LCD with 160x128 resolution
- 16-bit color depth for rich visual feedback
- Connected to dedicated SPI port for fast updates
- 8 responsive control buttons with silicone tops
- 5x NeoPixel RGB LEDs for visual indicators
Sensors & Peripherals
- Triple-axis accelerometer for motion detection
- Light sensor for ambient light measurement
- Reset button and on/off switch
- Feather-compatible header layout for expansion
Pinout Diagrams
EdgeBadge Pinout (Same as PyBadge)
Basic Wiring Examples
External Microphone Connection
MAX4466 Microphone VCC → EdgeBadge 3V
MAX4466 Microphone GND → EdgeBadge GND
MAX4466 Microphone OUT → EdgeBadge Pin A1 (D2 connector)

Note: EdgeBadge has built-in PDM microphone, external mic for comparison
I2C Sensor Connection (STEMMA)
I2C Sensor VCC → EdgeBadge STEMMA 3V/5V
I2C Sensor GND → EdgeBadge STEMMA GND
I2C Sensor SDA → EdgeBadge STEMMA SDA
I2C Sensor SCL → EdgeBadge STEMMA SCL

Note: STEMMA connector is Grove-compatible
External Speaker Connection
8Ω Speaker + → EdgeBadge Speaker Connector +
8Ω Speaker - → EdgeBadge Speaker Connector -

Note: Cut solder jumper to disable built-in buzzer when using external speaker
NeoPixel Strip Connection
NeoPixel Strip VCC → EdgeBadge 3V (D2/D3 connector)
NeoPixel Strip GND → EdgeBadge GND (D2/D3 connector)
NeoPixel Strip DIN → EdgeBadge Pin D2 or D3

Code: Use Adafruit_NeoPixel library with pin D2 or D3
Battery Power Connection
3.7V LiPo Battery + → EdgeBadge JST Battery Connector +
3.7V LiPo Battery - → EdgeBadge JST Battery Connector -

Note: Built-in charging circuit, monitor voltage on A6
Programming Setup Guide
Arduino IDE Setup
- Install Arduino IDE 1.8.19 or later
- Add Adafruit board package URL in preferences
- Install “Adafruit SAMD Boards” package
- Install required libraries:
- Adafruit Arcada Library
- Arduino_TensorFlowLite
- Adafruit GFX Library
- Adafruit ST7735 and ST7789 Library
- Select “Adafruit PyBadge M4” from Tools → Board
TensorFlow Lite Library Installation
- Open Arduino IDE Library Manager
- Search for “Arduino_TensorFlowLite”
- Install latest version
- Install “Adafruit Arcada” library
- Download TensorFlow Lite examples from GitHub
CircuitPython Setup
- Download CircuitPython UF2 for PyBadge from circuitpython.org
- Hold RESET while connecting USB to enter bootloader
- Drag UF2 file to PYBADGEBOOT drive
- Board reboots as CIRCUITPY drive
- Install required libraries in lib folder
Programming Examples
TensorFlow Lite - Micro Speech Recognition
#include <Adafruit_Arcada.h>
#include <TensorFlowLite.h>
#include <tensorflow/lite/micro/all_ops_resolver.h>
#include <tensorflow/lite/micro/micro_error_reporter.h>
#include <tensorflow/lite/micro/micro_interpreter.h>
#include <tensorflow/lite/schema/schema_generated.h>
// Include the model data
#include "micro_speech_model_data.h"
Adafruit_Arcada arcada;
// TensorFlow Lite globals
tflite::MicroErrorReporter micro_error_reporter;
tflite::AllOpsResolver resolver;
const tflite::Model* model = nullptr;
tflite::MicroInterpreter* interpreter = nullptr;
TfLiteTensor* input = nullptr;
TfLiteTensor* output = nullptr;
// Memory allocation for TensorFlow Lite
constexpr int kTensorArenaSize = 10 * 1024;
uint8_t tensor_arena[kTensorArenaSize];
void setup() {
Serial.begin(115200);
// Initialize Arcada
if (!arcada.arcadaBegin()) {
Serial.println("Failed to initialize Arcada!");
while(1);
}
arcada.displayBegin();
arcada.display->fillScreen(ARCADA_BLACK);
arcada.display->setTextColor(ARCADA_WHITE);
arcada.display->setTextSize(2);
arcada.display->setCursor(10, 50);
arcada.display->println("TensorFlow");
arcada.display->setCursor(10, 70);
arcada.display->println("Micro Speech");
// Initialize TensorFlow Lite
model = tflite::GetModel(micro_speech_model_data);
if (model->version() != TFLITE_SCHEMA_VERSION) {
Serial.println("Model schema version mismatch!");
return;
}
interpreter = new tflite::MicroInterpreter(
model, resolver, tensor_arena, kTensorArenaSize, µ_error_reporter);
interpreter->AllocateTensors();
input = interpreter->input(0);
output = interpreter->output(0);
Serial.println("TensorFlow Lite Micro Speech initialized");
}
void loop() {
uint32_t buttons = arcada.readButtons();
if (buttons & ARCADA_BUTTONMASK_A) {
// Record and process audio
arcada.display->fillScreen(ARCADA_BLACK);
arcada.display->setCursor(10, 50);
arcada.display->println("Listening...");
// Capture audio data (simplified)
// In real implementation, capture PDM microphone data
// and preprocess for model input
// Run inference
TfLiteStatus invoke_status = interpreter->Invoke();
if (invoke_status != kTfLiteOk) {
Serial.println("Invoke failed!");
return;
}
// Process results
float yes_score = output->data.f[0];
float no_score = output->data.f[1];
arcada.display->fillScreen(ARCADA_BLACK);
arcada.display->setCursor(10, 30);
if (yes_score > no_score && yes_score > 0.7) {
arcada.display->println("Heard: YES");
arcada.display->setTextColor(ARCADA_GREEN);
} else if (no_score > yes_score && no_score > 0.7) {
arcada.display->println("Heard: NO");
arcada.display->setTextColor(ARCADA_RED);
} else {
arcada.display->println("Uncertain");
arcada.display->setTextColor(ARCADA_YELLOW);
}
delay(2000);
arcada.display->setTextColor(ARCADA_WHITE);
}
delay(100);
}TensorFlow Lite - Gesture Recognition
#include <Adafruit_Arcada.h>
#include <Adafruit_LIS3DH.h>
#include <TensorFlowLite.h>

// Include gesture model
#include "gesture_model_data.h"

Adafruit_Arcada arcada;
Adafruit_LIS3DH lis3dh;

// TensorFlow Lite setup (similar to above)
// ... TensorFlow Lite globals ...

// Gesture data collection
const int GESTURE_SAMPLES = 119;
const int GESTURE_FEATURES = 3; // x, y, z accelerometer
float gesture_data[GESTURE_SAMPLES * GESTURE_FEATURES];
int sample_count = 0;

void setup() {
  Serial.begin(115200);

  if (!arcada.arcadaBegin()) {
    Serial.println("Failed to initialize Arcada!");
    while(1);
  }

  // Initialize accelerometer
  if (!lis3dh.begin(0x19)) {
    Serial.println("Failed to initialize accelerometer!");
    while(1);
  }

  arcada.displayBegin();
  arcada.display->fillScreen(ARCADA_BLACK);
  arcada.display->setTextColor(ARCADA_WHITE);
  arcada.display->setTextSize(2);

  // Initialize TensorFlow Lite (similar to speech example)
  // ... TensorFlow Lite initialization ...

  Serial.println("Gesture recognition ready");
}

void loop() {
  uint32_t buttons = arcada.readButtons();

  if (buttons & ARCADA_BUTTONMASK_A) {
    // Start gesture recording
    arcada.display->fillScreen(ARCADA_BLACK);
    arcada.display->setCursor(10, 50);
    arcada.display->println("Recording");
    arcada.display->setCursor(10, 70);
    arcada.display->println("Gesture...");

    sample_count = 0;

    // Collect accelerometer data
    while (sample_count < GESTURE_SAMPLES) {
      lis3dh.read();

      // Normalize accelerometer data
      float x = lis3dh.x / 16384.0;
      float y = lis3dh.y / 16384.0;
      float z = lis3dh.z / 16384.0;

      gesture_data[sample_count * 3 + 0] = x;
      gesture_data[sample_count * 3 + 1] = y;
      gesture_data[sample_count * 3 + 2] = z;

      sample_count++;
      delay(20); // 50Hz sampling
    }

    // Copy data to model input
    for (int i = 0; i < GESTURE_SAMPLES * GESTURE_FEATURES; i++) {
      input->data.f[i] = gesture_data[i];
    }

    // Run inference
    TfLiteStatus invoke_status = interpreter->Invoke();
    if (invoke_status != kTfLiteOk) {
      Serial.println("Invoke failed!");
      return;
    }

    // Process results
    float punch_score = output->data.f[0];
    float flex_score = output->data.f[1];

    arcada.display->fillScreen(ARCADA_BLACK);
    arcada.display->setCursor(10, 30);

    if (punch_score > flex_score && punch_score > 0.8) {
      arcada.display->println("PUNCH!");
      arcada.display->setTextColor(ARCADA_RED);
      // Light up NeoPixels red
      for (int i = 0; i < 5; i++) {
        arcada.pixels.setPixelColor(i, 255, 0, 0);
      }
      arcada.pixels.show();
    } else if (flex_score > punch_score && flex_score > 0.8) {
      arcada.display->println("FLEX!");
      arcada.display->setTextColor(ARCADA_BLUE);
      // Light up NeoPixels blue
      for (int i = 0; i < 5; i++) {
        arcada.pixels.setPixelColor(i, 0, 0, 255);
      }
      arcada.pixels.show();
    } else {
      arcada.display->println("Unknown");
      arcada.display->setTextColor(ARCADA_YELLOW);
    }

    delay(2000);
    arcada.pixels.clear();
    arcada.pixels.show();
    arcada.display->setTextColor(ARCADA_WHITE);
  }

  delay(100);
}
CircuitPython - Simple ML Dashboard
import board
import displayio
import terminalio
import adafruit_lis3dh
import adafruit_arcada
from adafruit_display_text import label
import time

# Initialize Arcada
arcada = adafruit_arcada.Arcada(board.DISPLAY, debug=False)
arcada.display.brightness = 1.0

# Initialize accelerometer
i2c = board.I2C()
lis3dh = adafruit_lis3dh.LIS3DH_I2C(i2c, address=0x19)

# Create display group
splash = displayio.Group()

# Title
title_label = label.Label(
    terminalio.FONT, text="ML Dashboard", color=0xFFFFFF, x=10, y=15
)
splash.append(title_label)

# Sensor data labels
accel_label = label.Label(
    terminalio.FONT, text="Accel: ", color=0x00FF00, x=10, y=40
)
splash.append(accel_label)

light_label = label.Label(
    terminalio.FONT, text="Light: ", color=0xFFFF00, x=10, y=60
)
splash.append(light_label)

battery_label = label.Label(
    terminalio.FONT, text="Battery: ", color=0xFF0000, x=10, y=80
)
splash.append(battery_label)

status_label = label.Label(
    terminalio.FONT, text="Status: Ready", color=0x00FFFF, x=10, y=100
)
splash.append(status_label)

board.DISPLAY.show(splash)

# Main loop
while True:
    # Read sensors
    x, y, z = lis3dh.acceleration
    light_level = arcada.light
    battery_voltage = arcada.battery

    # Update display
    accel_label.text = f"Accel: {x:.1f},{y:.1f},{z:.1f}"
    light_label.text = f"Light: {light_level}"
    battery_label.text = f"Battery: {battery_voltage:.2f}V"

    # Simple motion detection
    motion_magnitude = (x**2 + y**2 + z**2)**0.5
    if motion_magnitude > 12:
        status_label.text = "Status: Motion!"
        status_label.color = 0xFF0000
        # Flash NeoPixels
        arcada.pixels.fill((255, 0, 0))
        arcada.pixels.show()
    else:
        status_label.text = "Status: Still"
        status_label.color = 0x00FF00
        arcada.pixels.fill((0, 0, 0))
        arcada.pixels.show()

    # Check buttons
    buttons = arcada.get_pressed_buttons()
    if buttons:
        status_label.text = f"Button: {buttons}"
        status_label.color = 0x0000FF

    time.sleep(0.1)
Programming Support
TensorFlow Lite for Microcontrollers
- Optimized inference engine for embedded systems
- Support for quantized models (8-bit, 16-bit)
- Arduino library integration
- Pre-built voice recognition examples
- Model conversion tools and documentation
Arduino IDE
- Adafruit Arcada library for hardware abstraction
- TensorFlow Lite Arduino library
- Extensive ML examples and tutorials
- Integration with Arduino ecosystem
CircuitPython
- Python-based development environment
- TensorFlow Lite integration (experimental)
- Rapid prototyping and development
- Hardware abstraction libraries
MakeCode Arcade
- Visual programming environment
- Game development capabilities
- Educational ML projects
- Block-based programming interface
Machine Learning Applications
Voice Recognition
- Wake word detection
- Simple command recognition (yes/no, up/down)
- Voice-controlled interfaces
- Audio classification projects
Sensor Fusion
- Accelerometer-based gesture recognition
- Multi-modal input processing
- Environmental monitoring with ML
- Predictive maintenance applications
Educational Projects
- Introduction to machine learning concepts
- Edge AI development learning
- STEM education applications
- Interactive ML demonstrations
Development Workflow
- Model Training: Use TensorFlow to train models on desktop/cloud
- Model Conversion: Convert to TensorFlow Lite format
- Quantization: Optimize for microcontroller constraints
- Deployment: Upload to EdgeBadge via Arduino IDE
- Testing: Real-time inference and validation
Power Management
- Battery Support: 3.7V LiPoly battery compatibility
- USB Charging: Built-in charging circuit
- Power Optimization: Low-power modes for battery operation
- USB Power: Direct USB operation for development
Expansion & Connectivity
- Feather Compatibility: Two female headers for FeatherWings
- JST Connectors: NeoPixel, sensor, and I2C connections
- Grove Compatibility: I2C Grove connector support
- STEMMA QT: Compatible with sensor ecosystem
Package Contents
- 1x EdgeBadge PCB (fully assembled)
- 1x Set of female headers
- Documentation and ML tutorial links
Important Notes
- Cutting-Edge Technology: TensorFlow Lite for microcontrollers is rapidly evolving
- Model Limitations: Limited by microcontroller memory and processing power
- Development Environment: Requires familiarity with ML concepts and tools
- Battery Not Included: Requires separate LiPoly battery purchase
- Community Support: Active community developing ML examples and tutorials
Getting Started
- Install Arduino IDE and required libraries
- Download pre-trained voice recognition examples
- Upload and test basic speech recognition
- Experiment with custom model training
- Explore advanced ML applications
Recommended Accessories
- 3.7V LiPoly battery (350mAh or 500mAh)
- External 4-8 ohm speaker for better audio
- STEMMA QT sensors for multi-modal ML
- Protective case for portable deployment
- MicroSD card for additional model storage
Important Notes
TensorFlow Lite Considerations
- Memory Constraints: 192KB RAM limits model complexity
- Processing Power: 120MHz ARM Cortex-M4 for real-time inference
- Model Size: 2MB QSPI Flash for model storage
- Quantization: 8-bit quantized models recommended for best performance
- Inference Speed: Typical inference time 10-100ms depending on model
Audio Processing
- PDM Microphone: Built-in digital microphone for speech recognition
- Sample Rate: Typically 16kHz for speech applications
- Audio Buffer: Limited by available RAM
- Preprocessing: FFT and feature extraction on-device
- Noise Handling: Consider environmental noise in model training
Development Best Practices
- Start Simple: Begin with pre-trained models before custom training
- Iterative Development: Test frequently on actual hardware
- Power Management: Consider battery life in deployment scenarios
- Model Validation: Validate accuracy on target hardware
- Version Control: Track model versions and performance metrics
Troubleshooting Common Issues
- Model Loading Errors: Check model format and size constraints
- Memory Allocation: Reduce tensor arena size if needed
- Inference Failures: Verify input data preprocessing
- Performance Issues: Profile and optimize critical code paths
- Audio Problems: Check microphone connections and sample rates
Applications & Use Cases
Educational Projects
- STEM Learning: Hands-on machine learning education
- Computer Science: Embedded AI programming concepts
- Engineering: Real-world ML deployment challenges
- Research: Edge computing and TinyML research
Prototyping Applications
- Voice Interfaces: Smart home device prototypes
- Gesture Control: Wearable and IoT applications
- Sensor Fusion: Multi-modal input processing
- Edge Analytics: Local data processing and decision making
Commercial Development
- Product Validation: Proof-of-concept development
- Cost Analysis: Edge vs cloud processing trade-offs
- Performance Testing: Real-world deployment scenarios
- User Experience: Interactive ML interface design
Learning Resources
- TensorFlow Lite for Microcontrollers: Official documentation and tutorials
- Adafruit Learning System: EdgeBadge-specific guides and examples
- TinyML Community: Forums, papers, and research resources
- GitHub Repositories: Open-source models and example code
- Model Training Guides: Custom model development workflows
- Edge AI Courses: Online learning platforms and university courses