Important NoteThis entire repo was AI created - including all of the data within. The intent was to A) help me with my personal electronics inventory; and B) see how I could use AI to make that process a bit easier. DO NOT TRUST!
Adafruit FeatherWing OLED 128x64 STEMMA QT
Overview
The Adafruit FeatherWing OLED 128x64 is a gorgeous monochrome OLED display add-on that works with any Feather main board. This FeatherWing features a crisp 128x64 OLED display with high contrast and excellent readability, plus three user buttons (A, B, C) and a STEMMA QT connector for easy sensor integration.
Specifications
- Display Type: OLED (Organic Light Emitting Diode)
- Resolution: 128x64 pixels
- Colors: Monochrome white on black
- Screen Size: ~1.3” diagonal
- Display Area: ~25.8mm / ~1.0”
- Controller: SH1107 (not SSD1306)
- Interface: I2C
- Operating Voltage: 3.3V/5V compatible
- PCB Dimensions: 22.9mm x 50.9mm / 0.9” x 2”
Features
- High Contrast Display: Self-illuminating OLED pixels for excellent readability
- No Backlight Required: Each pixel generates its own light
- 3 User Buttons: Tactile buttons labeled A, B, and C for user interface
- STEMMA QT Connector: Easy plug-and-play connection for sensors and peripherals
- Reset Button: Convenient reset functionality
- I2C Interface: Uses only 2 pins plus power and ground
- Stackable Design: Can be stacked with other FeatherWings
- Pin Compatible: Upgrade path from 128x32 OLED FeatherWing
Pinout
- Power: 3.3V and Ground from Feather
- I2C: SDA and SCL pins
- Reset: Connected to Feather reset pin
- Buttons: A, B, C buttons accessible via I2C
- STEMMA QT: 4-pin JST SH connector (VCC, GND, SDA, SCL)
Applications
- Status displays for IoT projects
- Menu systems and user interfaces
- Sensor data visualization
- Debug information display
- Portable device displays
- Weather stations
- Data logging displays
Compatibility
- All Feather Boards: ESP8266, ESP32, M0, M4, RP2040, etc.
- Arduino IDE: Full library support
- CircuitPython: Native support
- STEMMA QT/Qwiic: Compatible with SparkFun Qwiic ecosystem
- Grove: Compatible with Grove I2C sensors via adapter cable
Programming Support
Arduino Libraries
- Adafruit SH1107 library
- Adafruit GFX library for graphics
- Button handling libraries
CircuitPython
- displayio support
- Built-in graphics capabilities
- Easy button integration
Pinout Diagrams
Official Adafruit OLED FeatherWing Schematic

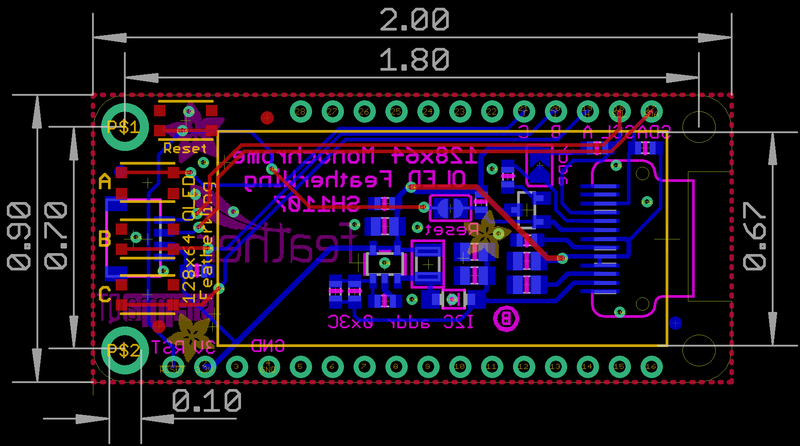
OLED FeatherWing Fabrication Print
Basic Wiring Examples
Standard FeatherWing Connection
Feather Board → OLED FeatherWing (via stacking headers)
- 3V → 3V
- GND → GND
- SCL → SCL
- SDA → SDA
- RST → RST (auto-connected)

Note: Use Feather stacking headers for easy connection
Non-Feather Board Connection (Minimal)
Microcontroller 3.3V → FeatherWing 3V
Microcontroller GND → FeatherWing GND
Microcontroller SCL → FeatherWing SCL
Microcontroller SDA → FeatherWing SDA
Microcontroller RST → FeatherWing RST

Note: Reset connection is required for proper operation
STEMMA QT Sensor Chain
FeatherWing STEMMA QT → STEMMA QT Cable → I2C Sensor
- Automatic 3.3V, GND, SCL, SDA connection
- Supports multiple sensors in chain
- Compatible with SparkFun Qwiic ecosystem

Example: FeatherWing → BME280 → LIS3DH → TSL2591
Button Connections (for non-Feather boards)
Button A → Microcontroller Pin 9 (or chosen GPIO)
Button B → Microcontroller Pin 6 (or chosen GPIO)
Button C → Microcontroller Pin 5 (or chosen GPIO)

Note: Buttons are active-low with internal pull-ups
Programming Setup Guide
Arduino IDE Setup
- Install Arduino IDE 1.8.19 or later
- Install required libraries via Library Manager:
- Adafruit SH110X library
- Adafruit GFX library
- Adafruit BusIO library (auto-installed)
- Select appropriate Feather board from Tools → Board
- Connect FeatherWing to Feather with stacking headers
CircuitPython Setup
- Install CircuitPython on your Feather board
- Install required libraries in lib folder:
- adafruit_displayio_sh1107
- adafruit_bus_device
- adafruit_display_text
- Create code.py file with your display code
Programming Examples
Arduino - Basic Display Test
#include <SPI.h>
#include <Wire.h>
#include <Adafruit_GFX.h>
#include <Adafruit_SH110X.h>

Adafruit_SH1107 display = Adafruit_SH1107(64, 128, &Wire);

// Button pins for different Feather boards
#if defined(ESP8266)
  #define BUTTON_A  0
  #define BUTTON_B 16
  #define BUTTON_C  2
#elif defined(ESP32)
  #define BUTTON_A 15
  #define BUTTON_B 32
  #define BUTTON_C 14
#else // M0, M4, nRF52840, RP2040
  #define BUTTON_A  9
  #define BUTTON_B  6
  #define BUTTON_C  5
#endif

void setup() {
  Serial.begin(115200);

  // Initialize display
  delay(250); // Wait for OLED to power up
  display.begin(0x3C, true); // I2C address 0x3C

  // Show Adafruit splash screen
  display.display();
  delay(2000);

  // Clear display
  display.clearDisplay();
  display.setRotation(1); // Landscape orientation

  // Initialize buttons
  pinMode(BUTTON_A, INPUT_PULLUP);
  pinMode(BUTTON_B, INPUT_PULLUP);
  pinMode(BUTTON_C, INPUT_PULLUP);

  Serial.println("OLED FeatherWing initialized");
}

void loop() {
  display.clearDisplay();

  // Display title
  display.setTextSize(1);
  display.setTextColor(SH110X_WHITE);
  display.setCursor(0, 0);
  display.println("OLED FeatherWing Test");
  display.println();

  // Check buttons and display status
  display.print("Buttons: ");
  if (!digitalRead(BUTTON_A)) {
    display.print("A ");
  }
  if (!digitalRead(BUTTON_B)) {
    display.print("B ");
  }
  if (!digitalRead(BUTTON_C)) {
    display.print("C ");
  }
  display.println();

  // Display some graphics
  display.drawRect(0, 40, 128, 24, SH110X_WHITE);
  display.fillRect(2, 42, 124, 20, SH110X_WHITE);

  display.setTextColor(SH110X_BLACK);
  display.setCursor(10, 48);
  display.println("Graphics Test");

  display.display();
  delay(100);
}
Important Notes
- OLED Lifespan: Pixels may dim after 1000+ hours of continuous use
- Power Management: Turn off display when not needed to preserve lifespan
- Controller Difference: Uses SH1107, not SSD1306 (requires specific library)
- Pin Usage: Uses I2C pins, can be stacked with other I2C devices
- Assembly: Comes with loose headers requiring soldering
Package Contents
- 1x FeatherWing OLED 128x64 PCB
- 1x Set of 0.1” headers (unattached)
- Documentation and tutorial links
Mounting
- Feather Stacking Headers: For permanent stacking installation
- Feather Female Headers: For removable connection
- Direct Soldering: Large square pads available for wire connections
- Mounting Holes: Available for secure enclosure mounting