Important NoteThis entire repo was AI created - including all of the data within. The intent was to A) help me with my personal electronics inventory; and B) see how I could use AI to make that process a bit easier. DO NOT TRUST!
Adafruit FunHouse - WiFi Home Automation Development Board
Overview
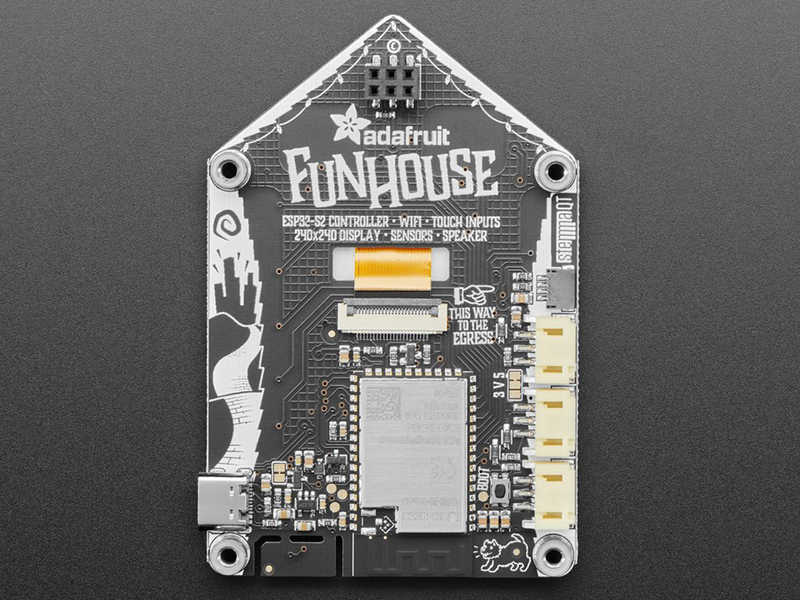
The Adafruit FunHouse is a comprehensive WiFi-enabled home automation development board built around the ESP32-S2 microcontroller. Designed to make home automation projects easy and accessible, it features a color TFT display, multiple built-in sensors, extensive connectivity options, and support for both CircuitPython and Arduino development environments.
Specifications
- Processor: ESP32-S2 240MHz Tensilica processor
- Memory: 4MB Flash, 2MB PSRAM (WROVER module)
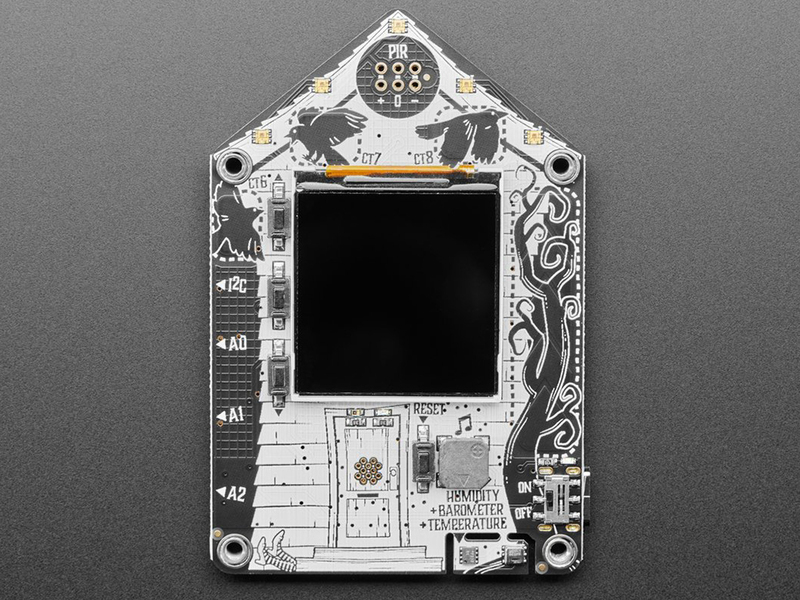
- Display: 1.54” Color TFT (240x240 pixels)
- Connectivity: WiFi 802.11 b/g/n, USB-C
- Power: USB-C or external power input
- Dimensions: 85mm x 56mm x 10.8mm
- Weight: 26.6g
Key Features
ESP32-S2 Processor
- 240MHz Performance: Fast processing for IoT applications
- Native USB: Acts as keyboard, mouse, MIDI device, or disk drive
- WiFi Connectivity: Built-in 802.11 b/g/n WiFi with antenna
- FCC/CE Certified: WROVER module with regulatory approval
- Large Memory: 4MB Flash and 2MB PSRAM for data buffers
Built-in Sensors
- DPS310: Barometric pressure and temperature sensor
- AHT20: Relative humidity and temperature sensor
- Light Sensor: Front-facing ambient light detection
- PIR Socket: Plug-in socket for mini PIR motion sensor (sold separately)
Display and Interface
- 1.54” TFT Display: 240x240 pixel color display with SPI interface
- Controllable Backlight: Adjustable brightness
- Five RGB LEDs: Mini DotStar LEDs for status indication
- Three Buttons: User input and wake-from-sleep functionality
- Capacitive Touch: Three touch pads and one 5-element slider
Connectivity Options
- STEMMA QT: I2C connector for sensors and devices
- Three STEMMA 3-pin: Digital/analog/PWM connections
- USB-C: Power and data with native USB support
- Speaker/Buzzer: Built-in audio output for notifications
Hardware Components
Environmental Sensors
- DPS310 Pressure Sensor: ±0.002 hPa precision, temperature compensation
- AHT20 Humidity Sensor: ±2% RH accuracy, -40°C to +85°C range
- Light Sensor: Ambient light detection for automatic display brightness
- Temperature Monitoring: Dual temperature sensors for accuracy
User Interface
- Color Display: High-quality IPS TFT with wide viewing angles
- Touch Interface: Capacitive touch pads and slider
- Physical Buttons: Three tactile buttons for reliable input
- LED Indicators: Five programmable RGB LEDs
- Audio Feedback: Built-in buzzer for audible notifications
Expansion Capabilities
- STEMMA QT: Connect I2C devices like additional sensors
- STEMMA 3-pin: Connect NeoPixels, servos, relays, or sensors
- PIR Socket: Easy connection for motion detection
- GPIO Access: Additional pins available for custom connections
Software Support
CircuitPython
- Native Support: Optimized CircuitPython support
- Rapid Development: Quick prototyping and testing
- Extensive Libraries: Access to CircuitPython ecosystem
- Interactive Development: REPL for real-time coding
- File System: Appears as USB drive for easy file management
Arduino IDE
- ESP32 Support: Full Arduino IDE compatibility
- Arduino Libraries: Access to vast Arduino library ecosystem
- Familiar Environment: Standard Arduino development workflow
- Community Support: Large ESP32 Arduino community
Development Tools
- Adafruit Libraries: Comprehensive sensor and display libraries
- Example Projects: Multiple ready-to-use examples
- Documentation: Extensive guides and tutorials
- Web IDE: Browser-based development options
Applications
Home Automation
- Environmental Monitoring: Temperature, humidity, pressure tracking
- Smart Displays: Weather stations, status displays
- Motion Detection: Security and automation triggers
- Remote Control: WiFi-controlled devices and systems
IoT Projects
- Sensor Networks: Multi-sensor data collection
- Cloud Integration: Connect to IoT platforms and services
- Data Logging: Local and cloud data storage
- Remote Monitoring: Access data from anywhere
Educational Use
- STEM Education: Teaching IoT and automation concepts
- Programming Courses: CircuitPython and Arduino learning
- Science Projects: Environmental data collection
- Maker Education: Hands-on technology learning
Connectivity Features
WiFi Capabilities
- 802.11 b/g/n: Standard WiFi connectivity
- WPA/WPA2: Secure wireless connections
- Access Point Mode: Can create its own WiFi network
- Station Mode: Connect to existing WiFi networks
- SSL/TLS: Secure communications support
Internet Integration
- HTTP/HTTPS: Web client and server capabilities
- MQTT: IoT messaging protocol support
- REST APIs: Easy integration with web services
- Cloud Services: Connect to AWS, Google Cloud, Azure
- Adafruit IO: Native support for Adafruit’s IoT platform
Power Management
Power Options
- USB-C: Primary power and programming interface
- External Power: VIN pin for battery or adapter power
- Low Power Modes: Deep sleep for battery operation
- Power Monitoring: Built-in power management features
Battery Operation
- LiPoly Support: Can be powered by lithium polymer batteries
- Charging Circuit: Built-in battery charging (with appropriate circuit)
- Sleep Modes: Extended battery life with deep sleep
- Wake Sources: Wake from buttons, sensors, or timers
Environmental Monitoring
Sensor Capabilities
- Temperature: Dual sensors for accuracy and redundancy
- Humidity: Precise relative humidity measurement
- Pressure: Barometric pressure for weather monitoring
- Light: Ambient light for automatic adjustments
- Motion: PIR sensor support for occupancy detection
Data Collection
- Real-time Monitoring: Continuous sensor reading
- Data Logging: Store data locally or in cloud
- Trend Analysis: Track environmental changes over time
- Alerts: Trigger notifications based on sensor values
Package Contents
- 1x FunHouse development board
- Documentation and getting started guide
- Example code and libraries
- Mounting hardware (varies by version)
Important Notes
- PIR Sensor: Motion sensor sold separately
- WiFi Range: Performance depends on WiFi signal strength
- Power Requirements: Check power needs for connected devices
- Development Environment: CircuitPython recommended for beginners
- Sensor Calibration: Some sensors may need calibration
Advantages
- All-in-One: Complete home automation platform
- Easy Development: CircuitPython makes programming simple
- Extensive Sensors: Multiple built-in environmental sensors
- Expandable: Multiple expansion options
- WiFi Ready: Built-in connectivity for IoT projects
Getting Started
Basic Setup
- Install CircuitPython: Flash latest CircuitPython firmware
- Connect USB-C: Use USB-C cable for power and programming
- Install Libraries: Add required CircuitPython libraries
- Run Examples: Start with built-in sensor examples
- Configure WiFi: Set up wireless connectivity
First Project
- Sensor Display: Show environmental data on screen
- WiFi Connection: Connect to home network
- Data Logging: Log sensor data to file
- Web Interface: Create simple web server
- IoT Integration: Connect to cloud service
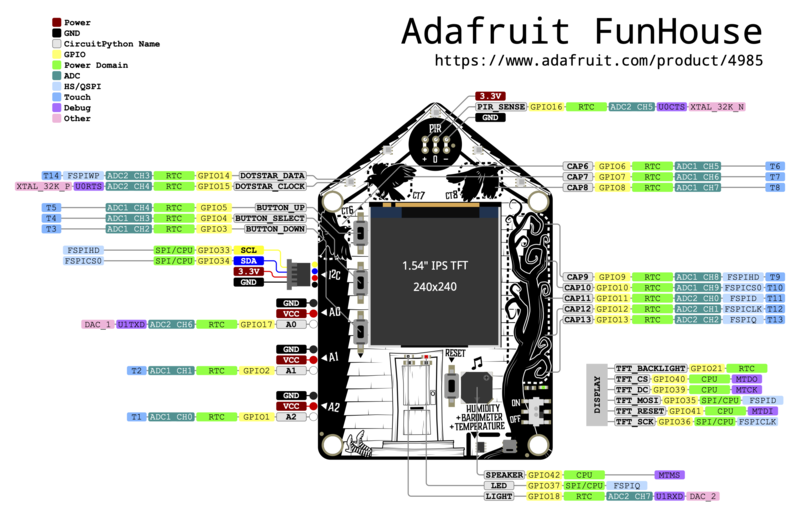
Pinout Diagrams
Official Adafruit FunHouse Pinouts
Basic Wiring Examples
PIR Motion Sensor Connection
Mini PIR Sensor + → FunHouse PIR Socket + (3.3V)
Mini PIR Sensor - → FunHouse PIR Socket - (GND)
Mini PIR Sensor OUT → FunHouse PIR Socket Signal (GPIO16)

Note: Insert PIR sensor through front of board into back connector
External NeoPixel Strip (A0 Port)
NeoPixel Strip VCC → FunHouse A0 Port + (5V/3.3V selectable)
NeoPixel Strip GND → FunHouse A0 Port - (GND)
NeoPixel Strip DIN → FunHouse A0 Port Signal (GPIO17)

Code: import neopixel; pixels = neopixel.NeoPixel(board.A0, 30)
Servo Motor Connection (A1 Port)
Servo Red Wire → FunHouse A1 Port + (5V)
Servo Black Wire → FunHouse A1 Port - (GND)
Servo White Wire → FunHouse A1 Port Signal (GPIO2)

Code: import pwmio; servo = pwmio.PWMOut(board.A1, frequency=50)
Relay Module Connection (A2 Port)
Relay Module VCC → FunHouse A2 Port + (5V)
Relay Module GND → FunHouse A2 Port - (GND)
Relay Module IN → FunHouse A2 Port Signal (GPIO1)

Code: import digitalio; relay = digitalio.DigitalInOut(board.A2)
I2C Sensor via STEMMA QT
I2C Sensor VCC → FunHouse STEMMA QT 3.3V
I2C Sensor GND → FunHouse STEMMA QT GND
I2C Sensor SDA → FunHouse STEMMA QT SDA
I2C Sensor SCL → FunHouse STEMMA QT SCL

Note: Use STEMMA QT cable for plug-and-play connection
External Speaker Connection
8Ω Speaker + → FunHouse Speaker Terminal +
8Ω Speaker - → FunHouse Speaker Terminal -

Note: Built-in amplifier on GPIO42 (DAC)
Battery Power Connection
3.7V LiPo Battery + → FunHouse Battery JST Connector +
3.7V LiPo Battery - → FunHouse Battery JST Connector -

Note: Built-in charging circuit when USB connected
Programming Setup Guide
CircuitPython Setup (Recommended)
- Download CircuitPython UF2 for FunHouse from circuitpython.org
- Hold BOOT button while pressing RESET to enter bootloader
- Drag UF2 file to FUNHOUSEBOOT drive
- Board reboots as CIRCUITPY drive
- Install required libraries in lib folder
Arduino IDE Setup
- Install Arduino IDE 1.8.19 or later
- Add ESP32 board package URL in preferences
- Install “ESP32” boards package
- Install required libraries:
- Adafruit GFX Library
- Adafruit ST7789 Library
- Adafruit DotStar Library
- Adafruit DPS310 Library
- Adafruit AHTX0 Library
- Select “Adafruit FunHouse” from Tools → Board
WiFi Configuration
- Create secrets.py file with WiFi credentials
- Add SSID and password for network connection
- Configure time zone and location settings
- Set up API keys for weather/IoT services
Programming Examples
CircuitPython - Home Automation Dashboard
import board
import displayio
import terminalio
import wifi
import socketpool
import adafruit_requests
import adafruit_dps310
import adafruit_ahtx0
from adafruit_display_text import label
from adafruit_funhouse import FunHouse
import time

# Initialize FunHouse
funhouse = FunHouse(default_bg=0x0F0F00)

# Initialize sensors
i2c = board.STEMMA_I2C()
dps310 = adafruit_dps310.DPS310(i2c)
aht20 = adafruit_ahtx0.AHTx0(i2c)

# Connect to WiFi
try:
    from secrets import secrets
except ImportError:
    print("WiFi secrets are kept in secrets.py, please add them there!")
    raise

wifi.radio.connect(secrets["ssid"], secrets["password"])
pool = socketpool.SocketPool(wifi.radio)
requests = adafruit_requests.Session(pool)

# Create display labels
temp_label = label.Label(terminalio.FONT, text="Temp: --°F", color=0xFFFFFF)
temp_label.x = 10
temp_label.y = 30
funhouse.splash.append(temp_label)

humidity_label = label.Label(terminalio.FONT, text="Humidity: --%", color=0x00FFFF)
humidity_label.x = 10
humidity_label.y = 50
funhouse.splash.append(humidity_label)

pressure_label = label.Label(terminalio.FONT, text="Pressure: -- hPa", color=0x00FF00)
pressure_label.x = 10
pressure_label.y = 70
funhouse.splash.append(pressure_label)

light_label = label.Label(terminalio.FONT, text="Light: --", color=0xFFFF00)
light_label.x = 10
light_label.y = 90
funhouse.splash.append(light_label)

weather_label = label.Label(terminalio.FONT, text="Weather: Loading...", color=0xFF00FF)
weather_label.x = 10
weather_label.y = 110
funhouse.splash.append(weather_label)

status_label = label.Label(terminalio.FONT, text="Status: Ready", color=0xFF0000)
status_label.x = 10
status_label.y = 130
funhouse.splash.append(status_label)

# Main loop
last_weather_update = 0
weather_interval = 300  # 5 minutes

while True:
    # Read sensors
    temperature = aht20.temperature * 9/5 + 32  # Convert to Fahrenheit
    humidity = aht20.relative_humidity
    pressure = dps310.pressure
    light_level = funhouse.peripherals.light

    # Update sensor displays
    temp_label.text = f"Temp: {temperature:.1f}°F"
    humidity_label.text = f"Humidity: {humidity:.1f}%"
    pressure_label.text = f"Pressure: {pressure:.1f} hPa"
    light_label.text = f"Light: {light_level}"

    # Update weather periodically
    current_time = time.monotonic()
    if current_time - last_weather_update > weather_interval:
        try:
            # Replace with your weather API
            weather_url = f"http://api.openweathermap.org/data/2.5/weather?q={secrets['location']}&appid={secrets['weather_api_key']}&units=imperial"
            response = requests.get(weather_url)
            weather_data = response.json()
            weather_desc = weather_data['weather'][0]['description']
            weather_temp = weather_data['main']['temp']
            weather_label.text = f"Outside: {weather_temp:.0f}°F {weather_desc}"
            last_weather_update = current_time
        except Exception as e:
            weather_label.text = "Weather: Error"
            print(f"Weather error: {e}")

    # Check buttons
    if funhouse.peripherals.button_up:
        status_label.text = "Status: Button UP"
        funhouse.peripherals.dotstars.fill((0, 255, 0))
    elif funhouse.peripherals.button_down:
        status_label.text = "Status: Button DOWN"
        funhouse.peripherals.dotstars.fill((255, 0, 0))
    elif funhouse.peripherals.button_select:
        status_label.text = "Status: Button SELECT"
        funhouse.peripherals.dotstars.fill((0, 0, 255))
    else:
        status_label.text = "Status: Ready"
        funhouse.peripherals.dotstars.fill((0, 0, 0))

    # Check PIR motion sensor
    if funhouse.peripherals.pir_sensor:
        status_label.text = "Status: MOTION!"
        funhouse.peripherals.dotstars.fill((255, 255, 0))
        funhouse.peripherals.play_tone(1000, 0.1)

    # Auto-adjust display brightness
    if light_level < 100:
        funhouse.display.brightness = 0.3
    elif light_level < 500:
        funhouse.display.brightness = 0.7
    else:
        funhouse.display.brightness = 1.0

    time.sleep(1)
Recommended Accessories
- Mini PIR motion sensor (Adafruit #4871)
- STEMMA QT sensors for additional monitoring
- LiPoly battery for portable operation
- Mounting plate and stand
- External speakers for audio projects