Important NoteThis entire repo was AI created - including all of the data within. The intent was to A) help me with my personal electronics inventory; and B) see how I could use AI to make that process a bit easier. DO NOT TRUST!
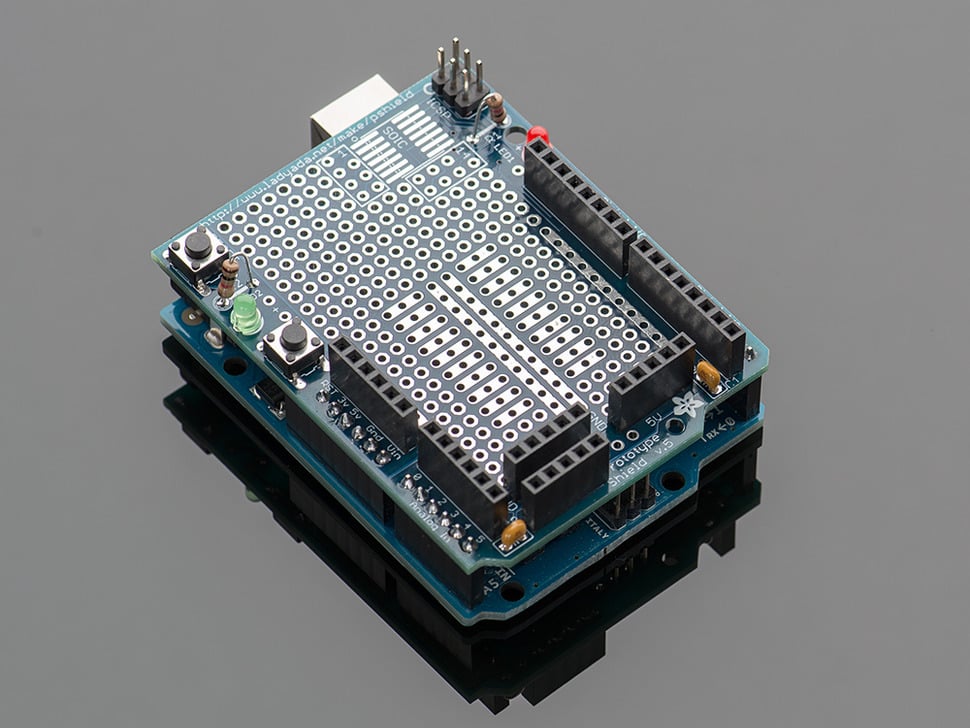
Adafruit Proto Shield for Arduino Kit v.5
Details
- Location: Cabinet-1, Bin 41
- Quantity: 1
⚠️ Product Status
No longer stocked - The Proto Shield has been updated, and is available as product #2077!
Overview
This prototyping shield is the best out there (well, we think so, at least). It works with UNO, NG, Diecimila and Duemilanove Arduinos. You can use it with a Leonardo but it will not break out the hardware SPI pins (they’re only on the ISP connector underneath) or the IOREF/SDA/SCL pins. However, the SDA/SCL pins on the Leonardo are also on digital #2 and #3 so you can still use them by connecting to #2 and #3.
Specifications
- Compatibility: Arduino Uno, NG, Diecimila, Duemilanove
- Prototyping Grid: Standard 0.1” x 0.1” spacing
- IC Pattern: Supports DIP ICs up to 20 pins
- Dimensions (assembled): 69mm x 53mm x 13mm (2.7” x 2.1” x 0.5”)
- Kit Type: Unassembled kit requiring soldering
Key Features
Prototyping Areas
- Standard Grid: 0.1” x 0.1” prototyping grid with big pads
- IC Pattern: DIP IC pattern for adding ICs up to 20 pins
- Power Rails: Power rails down the middle and sides
- SOIC Area: Surface-mount chip area for up to 14 SOIC size parts
Built-in Components
- Reset Button: Convenient reset button
- General Use Button: Extra button for user applications
- 2 LEDs: Red and green 3mm general use LEDs
- 2 Resistors: Matching resistors for the LEDs
- 2 Capacitors: 0.1µF capacitors on either side for power stability
Connectivity Features
- All Pins Brought Out: Every Arduino pin is accessible
- 3V and Reset Headers: New header pins included
- ICSP Header: Programming header at the top
- Breadboard Compatible: Works with tiny or standard breadboards
Hardware Components
Prototyping Grid
- Large Pads: Easy soldering with generous pad sizes
- Standard Spacing: 0.1” grid compatible with most components
- Through-hole: Standard through-hole component mounting
- Flexible Layout: Design your own circuit layouts
IC Support
- DIP IC Pattern: Accommodates 8-pin to 20-pin DIP packages
- Power Connections: Easy power and ground connections for ICs
- Bypass Capacitors: Built-in power filtering capacitors
- Standard Pinout: Compatible with common IC packages
Power Distribution
- Multiple Rails: Power rails on sides and middle
- 5V Distribution: 5V power available throughout board
- Ground Planes: Multiple ground connections
- Power Stability: Decoupling capacitors for clean power
User Interface Elements
- Reset Button: Easy access to Arduino reset
- User Button: Additional button for applications
- Status LEDs: Visual indicators for debugging
- LED Resistors: Current limiting resistors included
Arduino Compatibility
Supported Boards
- Arduino Uno: Full compatibility
- Arduino NG: Complete support
- Arduino Diecimila: All features work
- Arduino Duemilanove: Full functionality
Limited Compatibility
- Arduino Leonardo: Works but missing some pins
- Hardware SPI pins not broken out
- IOREF/SDA/SCL pins not available
- SDA/SCL available on digital pins 2 and 3
Pin Access
- Digital Pins: All 14 digital pins accessible
- Analog Pins: All 6 analog pins available
- Power Pins: 5V, 3.3V, GND, VIN all connected
- Special Pins: Reset, AREF, IOREF (on compatible boards)
Assembly Requirements
Kit Contents
- PCB: Proto shield printed circuit board
- Headers: Male headers for Arduino connection
- Components: LEDs, resistors, buttons, capacitors
- Hardware: Mounting hardware and spacers
Tools Needed
- Soldering Iron: 25-40W recommended
- Solder: 60/40 or lead-free solder
- Wire Cutters: For trimming component leads
- Multimeter: For testing connections (optional)
Assembly Process
- Solder Headers: Start with Arduino connection headers
- Add Components: Install LEDs, buttons, resistors
- Power Components: Install capacitors and power connections
- Test Connections: Verify all connections work
- Add Circuits: Build your custom circuits
Applications
Prototyping Projects
- Circuit Development: Test new circuit designs
- Sensor Integration: Add multiple sensors to Arduino
- Custom Interfaces: Build specialized input/output circuits
- Shield Development: Create custom Arduino shields
Educational Use
- Electronics Learning: Hands-on circuit building
- Soldering Practice: Learn through-hole soldering
- Circuit Design: Understand PCB layout principles
- Arduino Projects: Expand Arduino capabilities
Permanent Projects
- Custom Controllers: Build specialized control circuits
- Sensor Networks: Multi-sensor data collection
- Interface Boards: Connect Arduino to external systems
- Prototype to Product: Bridge between breadboard and PCB
Design Features
Power Management
- Stable Power: Decoupling capacitors reduce noise
- Multiple Rails: Easy power distribution
- Power Indicators: LED shows power status
- Protection: Proper power routing and filtering
Signal Integrity
- Short Traces: Minimize signal path lengths
- Ground Plane: Good grounding for stable operation
- Component Spacing: Adequate spacing prevents interference
- Quality PCB: Professional PCB manufacturing
Mechanical Design
- Standard Size: Fits Arduino form factor perfectly
- Mounting Holes: Secure mechanical attachment
- Component Clearance: Adequate height for components
- Connector Access: All Arduino connectors remain accessible
Circuit Building
Component Mounting
- Through-hole: Standard component mounting
- IC Sockets: Use sockets for removable ICs
- Wire Routing: Plan wire paths before soldering
- Component Orientation: Pay attention to polarity
Best Practices
- Plan Layout: Design circuit before soldering
- Test Sections: Test each section as you build
- Use Sockets: IC sockets for expensive components
- Document Design: Keep schematic of your circuit
Common Circuits
- Sensor Interfaces: Amplifiers and filters
- Motor Drivers: H-bridges and driver circuits
- Communication: RS232, I2C, SPI interfaces
- Power Supplies: Voltage regulators and converters
Troubleshooting
Assembly Issues
- Cold Joints: Ensure proper soldering temperature
- Bridged Connections: Check for solder bridges
- Component Orientation: Verify LED and capacitor polarity
- Header Alignment: Ensure headers are straight
Circuit Problems
- Power Issues: Check power rail connections
- Signal Problems: Verify signal routing
- Component Failures: Test individual components
- Arduino Communication: Ensure proper pin connections
Package Contents
- 1x Proto Shield PCB
- Headers and connectors
- LEDs, resistors, buttons, capacitors
- Assembly instructions
- Schematic and layout files
Important Notes
- Discontinued: This version (v.5) is no longer available
- Replacement Available: Updated version available as product #2077
- Soldering Required: Kit requires assembly
- Arduino Not Included: Arduino board sold separately
- Breadboard Not Included: Compatible breadboards sold separately
Advantages
- Complete Kit: Everything needed for prototyping
- High Quality: Professional PCB and components
- Educational: Great for learning electronics
- Flexible: Supports many different circuit types
- Arduino Compatible: Works with most Arduino boards
Limitations
- Discontinued: No longer in production
- Assembly Required: Soldering skills needed
- Limited Leonardo Support: Some pins not accessible
- Single Use: Once soldered, difficult to modify
- Size Constraints: Limited by Arduino shield form factor
Recommended Accessories
- Soldering iron and solder
- Wire strippers and cutters
- Breadboard for initial prototyping
- IC sockets for removable components
- Hookup wire for connections