Important NoteThis entire repo was AI created - including all of the data within. The intent was to A) help me with my personal electronics inventory; and B) see how I could use AI to make that process a bit easier. DO NOT TRUST!
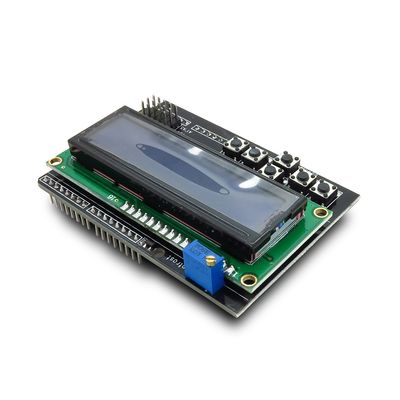
Arduino 1602 LCD Shield
Overview
This Arduino 1602 LCD Keypad shield is developed for Arduino compatible boards, to provide a user-friendly interface that allows users to go through the menu, make selections etc. It consists of a LCD1602 white character blue backlight LCD. The keypad consists of 5 keys — select, up, right, down and left. To save the digital IO pins, the keypad interface uses only one ADC channel. The key value is read through a 5 stage voltage divider.
Specifications
- PCB Size: 82.8mm x 56.6mm x 1.6mm
- Power Supply: 5V DC
- Display: 16x2 character LCD with blue backlight
- Keypad: 5 buttons (select, up, right, down, left)
- Interface: Uses minimal Arduino pins
- RoHS Compliant: Yes
Key Features
LCD Display
- 16x2 Characters: Two rows of 16 characters each
- White Characters: High contrast white text
- Blue Backlight: Adjustable blue LED backlight
- Standard HD44780: Compatible with standard LCD libraries
- Clear Display: Easy to read in various lighting conditions
Keypad Interface
- 5 Buttons: Select, Up, Right, Down, Left navigation
- Single Analog Pin: All buttons use only one analog input (A0)
- Voltage Divider: 5-stage voltage divider for button detection
- Debounced: Hardware debouncing for reliable operation
- Menu Navigation: Perfect for menu-driven applications
Arduino Compatibility
- Shield Form Factor: Standard Arduino shield size
- Pin Compatible: Works with Uno, Nano, Mega, and compatible boards
- Minimal Pin Usage: Efficient use of Arduino pins
- Stackable: Can be used with other shields (pin permitting)
Electrical Characteristics
| Parameter | Min | Typical | Max | Unit |
|---|---|---|---|---|
| Power Voltage | 4.5 | 5 | 5.5 | VDC |
| Input Voltage VH (3.3V target) | 3 | 3.3 | 3.6 | V |
| Input Voltage VH (5V target) | 4.5 | 5 | 5.5 | V |
| Input Voltage VL | -0.3 | 0 | 0.5 | V |
| Current Consumption | 20 | - | 40 | mA |
Pin Configuration
Digital Pins Used
- D4: LCD DB4 (Data bit 4)
- D5: LCD DB5 (Data bit 5)
- D6: LCD DB6 (Data bit 6)
- D7: LCD DB7 (Data bit 7)
- D8: LCD RS (Register Select)
- D9: LCD Enable
- D10: Backlight Control
Analog Pins Used
- A0: Button input (all 5 buttons via voltage divider)
Available Pins
- D0-D3: Available for other uses
- D11-D13: Available for other uses
- A1-A5: Available for other uses
Button Values
The buttons use a voltage divider network on analog pin A0. Typical ADC values:
- Right: ~0 (0V)
- Up: ~144 (~0.71V)
- Down: ~329 (~1.61V)
- Left: ~505 (~2.47V)
- Select: ~741 (~3.62V)
- None: ~1023 (~5V)
Programming
Basic LCD Control
#include <LiquidCrystal.h>

// Initialize with interface pins
LiquidCrystal lcd(8, 9, 4, 5, 6, 7);

void setup() {
  lcd.begin(16, 2);
  lcd.print("Hello, World!");
}
Button Reading
int readButtons() {
  int adc_key_in = analogRead(0);

  if (adc_key_in > 1000) return 0; // None
  if (adc_key_in < 50)   return 1; // Right
  if (adc_key_in < 195)  return 2; // Up
  if (adc_key_in < 380)  return 3; // Down
  if (adc_key_in < 555)  return 4; // Left
  if (adc_key_in < 790)  return 5; // Select

  return 0; // None
}
Applications
User Interface Projects
- Menu Systems: Navigate through options and settings
- Data Display: Show sensor readings and status information
- Control Panels: Simple control interfaces for projects
- Configuration: Set parameters and preferences
Educational Projects
- Arduino Learning: Ideal for learning LCD and button interfaces
- Programming Practice: Menu-driven programming exercises
- Electronics Education: Understanding voltage dividers and ADC
- Project Development: Rapid prototyping of user interfaces
Practical Applications
- Temperature Monitor: Display temperature with user controls
- Clock/Timer: Digital clock with alarm settings
- Data Logger: Display logged data with navigation
- Home Automation: Control panel for smart home systems
Library Support
Standard Libraries
- LiquidCrystal: Arduino’s built-in LCD library
- LiquidCrystal_I2C: For I2C LCD variants
- Custom Libraries: Many community libraries available
Example Libraries
- MenuSystem: Create hierarchical menu systems
- SimpleMenu: Basic menu navigation
- LCDKeypad: Specialized library for this shield type
Hardware Design
LCD Interface
- 4-bit Mode: Uses 4 data lines for efficient pin usage
- Standard Timing: Compatible with HD44780 timing
- Backlight Control: PWM control for brightness adjustment
- Contrast: Fixed contrast optimized for most applications
Button Circuit
- Voltage Divider: Resistor network creates unique voltages
- Single ADC: All buttons share one analog input
- Debouncing: Hardware RC debouncing for clean signals
- Pull-up: Internal pull-up ensures defined states
Troubleshooting
Display Issues
- Blank Display: Check power connections and contrast
- Garbled Text: Verify data pin connections
- No Backlight: Check backlight control pin and power
- Contrast Problems: Adjust contrast potentiometer if present
Button Issues
- No Response: Check A0 connection and voltage levels
- Wrong Values: Calibrate button threshold values
- Multiple Triggers: Check for proper debouncing
- Stuck Buttons: Verify button mechanical operation
Power Issues
- Insufficient Power: Ensure adequate 5V supply
- Voltage Drops: Check connections and wire gauge
- Noise: Add decoupling capacitors if needed
- Heat: Monitor for overheating components
Package Contents
- 1x Arduino 1602 LCD Shield (assembled)
- Documentation and example code links
- Schematic and datasheet access
Important Notes
- 5V Operation: Designed for 5V Arduino boards
- Pin Usage: Uses pins D4-D10 and A0
- Backlight Control: Pin D10 controls backlight (can be PWM)
- Button Calibration: May need to adjust button threshold values
- Shield Stacking: Consider pin conflicts with other shields
Advantages
- Easy to Use: Simple interface with minimal wiring
- Cost Effective: Affordable display and input solution
- Pin Efficient: Uses minimal Arduino pins
- Standard Interface: Compatible with common LCD libraries
- Educational: Great for learning embedded interfaces
Limitations
- Fixed Display Size: Limited to 16x2 characters
- Pin Usage: Uses several digital pins
- 5V Only: Not suitable for 3.3V systems without level shifting
- Button Resolution: Limited button combinations possible
- Backlight: Fixed blue color, not RGB
Recommended Accessories
- Arduino Uno or compatible board
- USB cable for programming
- External power supply for standalone operation
- Jumper wires for prototyping connections
- Additional shields (considering pin usage)