Important NoteThis entire repo was AI created - including all of the data within. The intent was to A) help me with my personal electronics inventory; and B) see how I could use AI to make that process a bit easier. DO NOT TRUST!
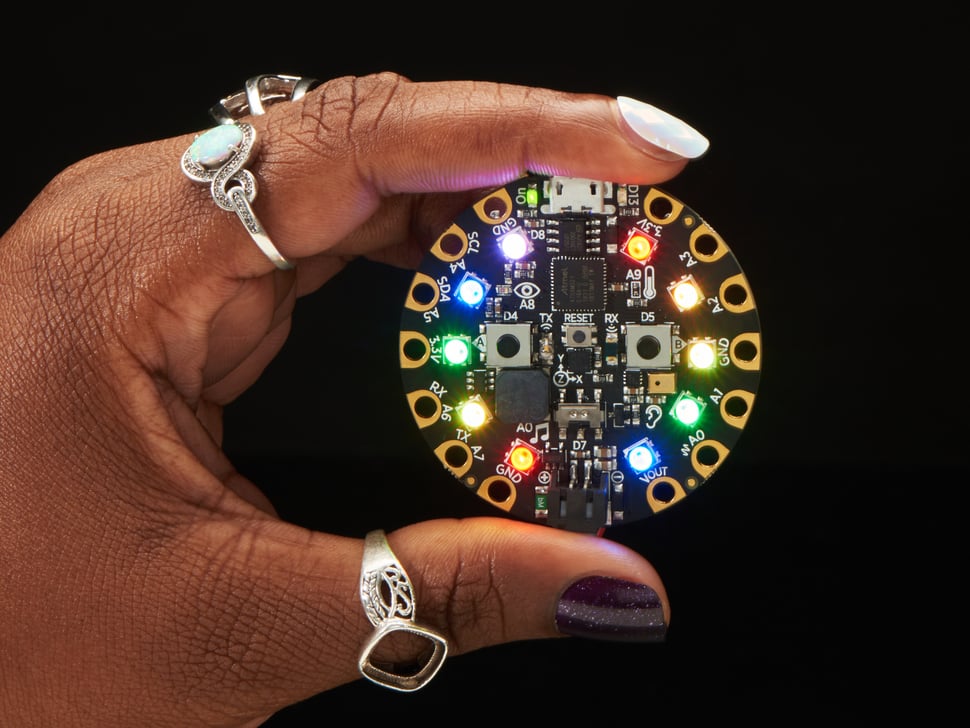
Circuit Playground Express
Overview
Circuit Playground Express is the next step towards a perfect introduction to electronics and programming. We’ve taken the original Circuit Playground Classic and made it even better! Not only did we pack even more sensors in, we also made it even easier to program with support for multiple programming environments.
Specifications
- Microcontroller: ATSAMD21 ARM Cortex M0 Processor
- Clock Speed: 48MHz
- Operating Voltage: 3.3V
- Flash Memory: Built-in flash + 2MB SPI Flash storage
- Outer Diameter: ~50.6mm / ~2.0”
- Weight: 8.9g
Key Features
Multiple Programming Options
- Microsoft MakeCode: Block-based or JavaScript programming
- CircuitPython: Python interpreter running on the board
- Arduino IDE: Full Arduino IDE support with low-level access
- Code.org CS Discoveries: Browser-based coding education
Enhanced Hardware
- 10x Mini NeoPixels: Full-color RGB LEDs with individual control
- Motion Sensor: LIS3DH triple-axis accelerometer with tap detection
- Temperature Sensor: Thermistor for ambient temperature
- Light Sensor: Phototransistor (can also act as color/pulse sensor)
- Sound Sensor: MEMS microphone for audio input
- Mini Speaker: Class D amplifier with 7.5mm magnetic speaker
- Infrared: Both receiver and transmitter for remote control
Connectivity and I/O
- 8x Alligator-Clip Pads: No soldering required
- 7x Capacitive Touch: Touch-sensitive input pads
- 1x True Analog Output: Real DAC output
- Multiple PWM: Multiple PWM-capable outputs
- I2C, UART: Hardware communication interfaces
Hardware Components
Sensors and Inputs
- LIS3DH Accelerometer: 3-axis motion with tap and free-fall detection
- Thermistor: Temperature sensing with wide range
- Phototransistor: Light sensing with color detection capability
- MEMS Microphone: High-quality audio input
- Infrared Receiver: Receive remote control signals
- Capacitive Touch: 7 touch-sensitive pads
Outputs and Indicators
- 10x NeoPixels: Individually addressable RGB LEDs
- Class D Amplifier: High-quality audio output
- Infrared Transmitter: Send remote control codes
- Green ON LED: Power indicator
- Red #13 LED: User programmable LED
User Interface
- 2x Push Buttons: Labeled A and B for user input
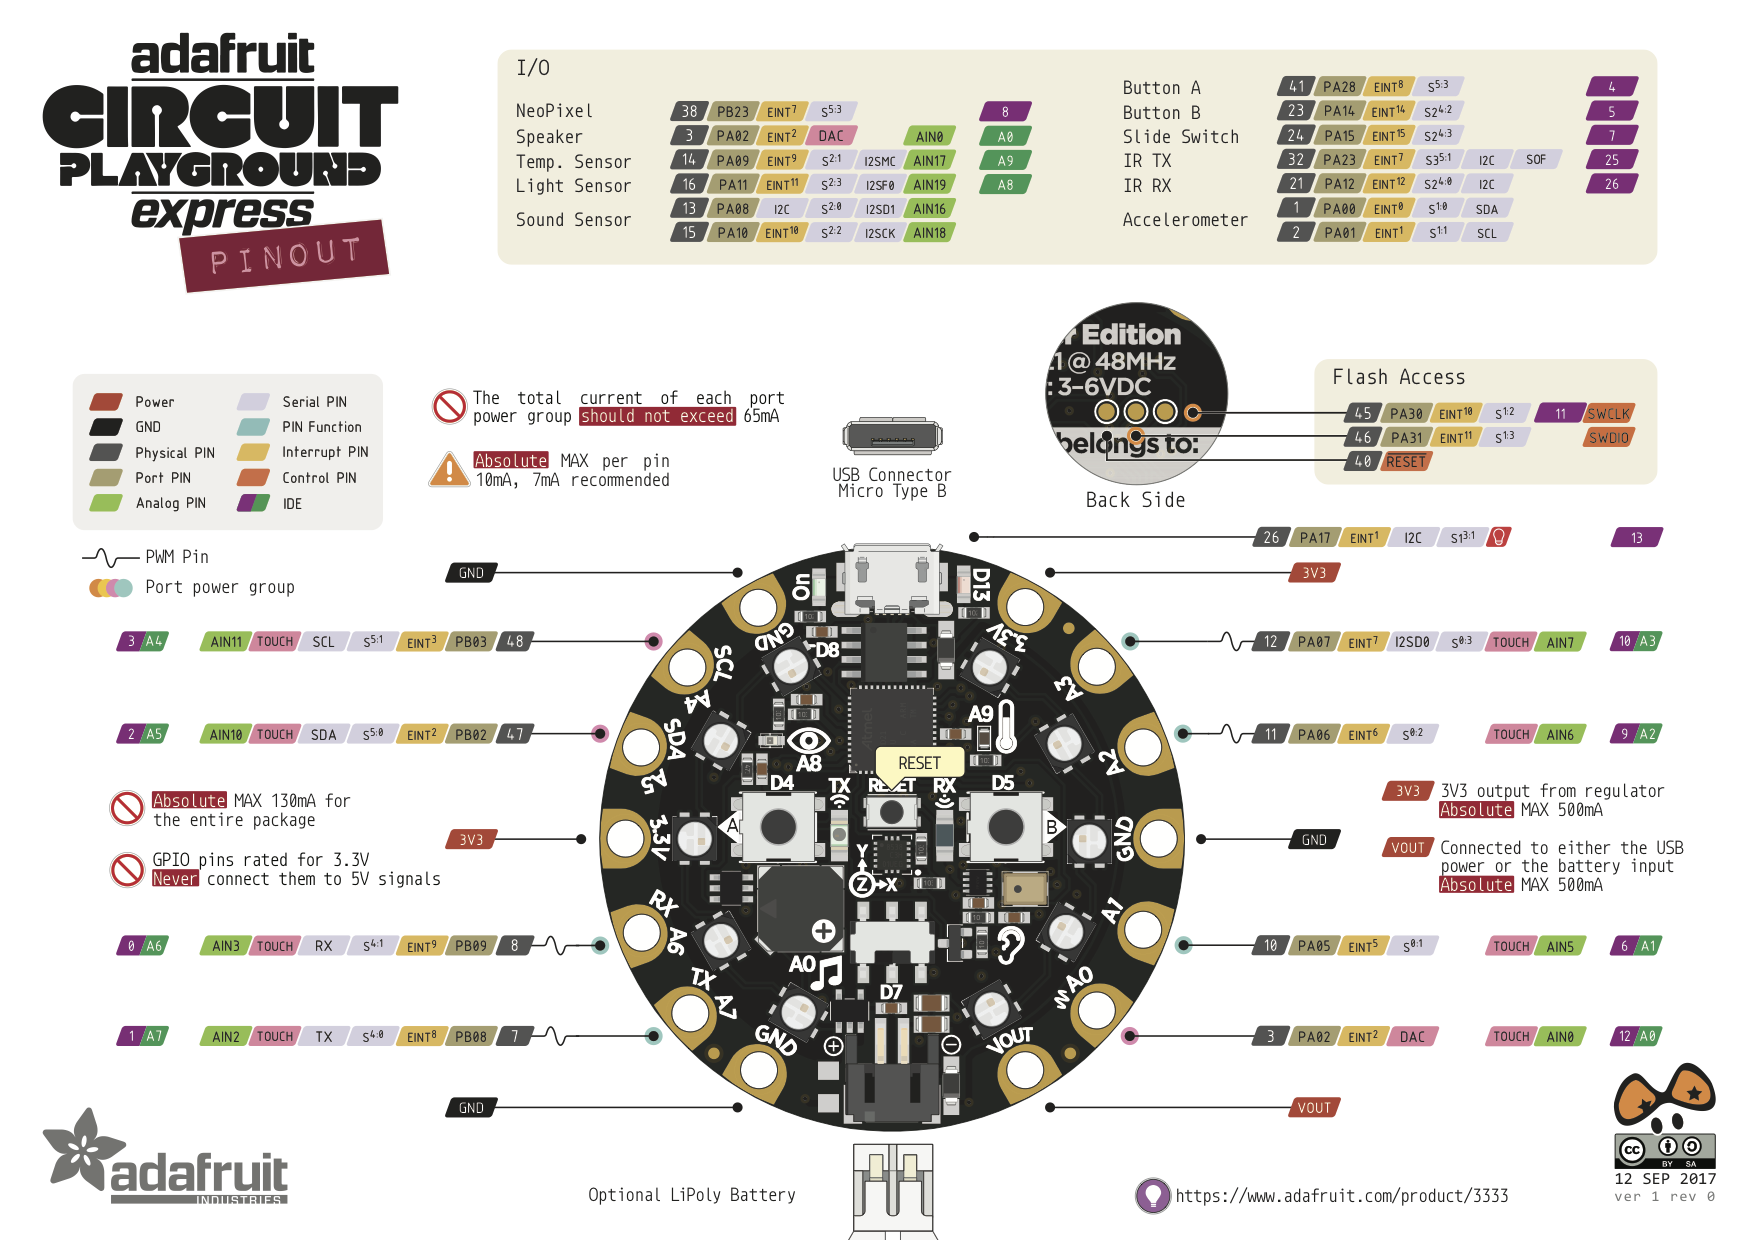
Pinout Diagram
Basic Wiring Examples
External LED Connection
CPX Pin A1 → LED Anode (long leg)
LED Cathode (short leg) → 220Ω Resistor → CPX GND

Note: Built-in NeoPixels available for most projects
Button/Switch Connection
CPX 3.3V → 10kΩ Pull-up Resistor → CPX Pin A2
CPX Pin A2 → Button → CPX GND

Code: digitalRead(A2) returns HIGH when not pressed, LOW when pressed
Servo Motor Connection
Servo Red Wire → CPX VOUT (5V power)
Servo Black/Brown Wire → CPX GND
Servo White/Orange Wire → CPX Pin A1 (PWM)

Note: Use VOUT for high-power devices like servos
I2C Device Connection
I2C Device VCC → CPX 3.3V
I2C Device GND → CPX GND
I2C Device SDA → CPX Pin A5 (SDA)
I2C Device SCL → CPX Pin A4 (SCL)

Note: Built-in pull-up resistors included
Analog Sensor Reading
Sensor Output → CPX Pin A1, A2, A3, A6, or A7
Sensor VCC → CPX 3.3V
Sensor GND → CPX GND

Code: analogRead(A1) returns 0-65535 (0-3.3V)
Alligator Clip Connections
No soldering required! Use alligator clips to connect:
- Conductive materials (fruit, water, foil)
- Breadboard components
- Sensors and actuators
- Educational experiments
Programming Examples
CircuitPython NeoPixel Rainbow
import board
import neopixel
import time

pixels = neopixel.NeoPixel(board.NEOPIXEL, 10, brightness=0.3)

def wheel(pos):
    if pos < 0 or pos > 255:
        return (0, 0, 0)
    if pos < 85:
        return (255 - pos * 3, pos * 3, 0)
    if pos < 170:
        pos -= 85
        return (0, 255 - pos * 3, pos * 3)
    pos -= 170
    return (pos * 3, 0, 255 - pos * 3)

while True:
    for j in range(255):
        for i in range(10):
            pixel_index = (i * 256 // 10) + j
            pixels[i] = wheel(pixel_index & 255)
        pixels.show()
        time.sleep(0.01)
CircuitPython Button and Sound
import board
import digitalio
import audioio
import audiocore
import time

# Set up buttons
button_a = digitalio.DigitalInOut(board.BUTTON_A)
button_a.direction = digitalio.Direction.INPUT
button_a.pull = digitalio.Pull.DOWN

button_b = digitalio.DigitalInOut(board.BUTTON_B)
button_b.direction = digitalio.Direction.INPUT
button_b.pull = digitalio.Pull.DOWN

# Set up speaker
speaker = audioio.AudioOut(board.SPEAKER)

while True:
    if button_a.value:
        print("Button A pressed!")
        # Play tone (requires audio file)

    if button_b.value:
        print("Button B pressed!")

    time.sleep(0.1)
CircuitPython Accelerometer
import board
import adafruit_lis3dh
import busio
import time

# Set up accelerometer
i2c = busio.I2C(board.ACCELEROMETER_SCL, board.ACCELEROMETER_SDA)
lis3dh = adafruit_lis3dh.LIS3DH_I2C(i2c)

while True:
    x, y, z = lis3dh.acceleration
    print(f"X: {x:6.2f} Y: {y:6.2f} Z: {z:6.2f} m/s^2")

    # Detect shake
    if abs(x) > 15 or abs(y) > 15 or abs(z) > 15:
        print("Shake detected!")

    time.sleep(0.1)
MakeCode Block Example (JavaScript)
// Button A controls NeoPixels
input.onButtonPressed(Button.A, function () {
  light.setAll(0xff0000); // Red
  music.playTone(262, music.beat(BeatFraction.Half));
});

// Button B controls NeoPixels
input.onButtonPressed(Button.B, function () {
  light.setAll(0x0000ff); // Blue
  music.playTone(523, music.beat(BeatFraction.Half));
});

// Shake detection
input.onGesture(Gesture.Shake, function () {
  light.showRing(`red red red red red red red red red red`);
  music.playMelody("C D E F G A B C5 ", 120);
});
Arduino Example
#include <Adafruit_CircuitPlayground.h>

void setup() {
  CircuitPlayground.begin();
  Serial.begin(9600);
}

void loop() {
  // Check buttons
  if (CircuitPlayground.leftButton()) {
    CircuitPlayground.setPixelColor(0, 255, 0, 0);  // Red
    CircuitPlayground.playTone(440, 500);
  }

  if (CircuitPlayground.rightButton()) {
    CircuitPlayground.setPixelColor(0, 0, 0, 255);  // Blue
    CircuitPlayground.playTone(880, 500);
  }

  // Read sensors
  float temp = CircuitPlayground.temperature();
  float light = CircuitPlayground.lightSensor();

  Serial.print("Temperature: ");
  Serial.print(temp);
  Serial.print("°C, Light: ");
  Serial.println(light);

  delay(100);
}- 1x Slide Switch: Mode selection or on/off control
- Reset Button: Manual reset and bootloader entry
Programming Platforms
Microsoft MakeCode
- Block Programming: Drag-and-drop visual programming
- JavaScript: Text-based programming option
- Simulator: Test code without hardware
- Web-Based: No software installation required
- Educational: Perfect for beginners
CircuitPython
- Python Interpreter: Real Python running on microcontroller
- Interactive REPL: Live coding and debugging
- File System: Access board as USB drive
- Extensive Libraries: Large ecosystem of libraries
- Rapid Development: Quick iteration and testing
Arduino IDE
- Full Support: Complete Arduino IDE compatibility
- Low-Level Access: Direct hardware control
- C/C++ Programming: Traditional embedded programming
- Library Ecosystem: Access to Arduino libraries
- Advanced Features: For experienced developers
Code.org CS Discoveries
- Curriculum Integration: Part of computer science education
- Classroom Ready: Designed for educational environments
- Progressive Learning: Structured learning progression
- Teacher Resources: Comprehensive teaching materials
Pin Configuration
GPIO Pins (8 total)
- A0: Analog input, digital I/O, capacitive touch
- A1: Analog input, digital I/O, capacitive touch, true analog output
- A2: Analog input, digital I/O, capacitive touch
- A3: Analog input, digital I/O, capacitive touch
- A4: Analog input, digital I/O, capacitive touch
- A5: Analog input, digital I/O, capacitive touch
- A6: Analog input, digital I/O, capacitive touch
- A7: Analog input, digital I/O, capacitive touch
Power Pins
- 3.3V: Two power output pads
- GND: Three ground pads
- VBATT: Battery/USB voltage output
Communication
- SDA/SCL: I2C communication (shared with GPIO)
- TX/RX: UART communication (shared with GPIO)
- Multiple PWM: Various pins support PWM output
Storage and Memory
SPI Flash (2MB)
- CircuitPython Storage: Store code and libraries
- File System: Appears as USB drive when connected
- Data Logging: Store sensor data and logs
- User Files: Images, sounds, configuration files
Built-in Flash
- Program Storage: Store compiled programs
- Bootloader: UF2 bootloader for easy programming
- Multiple Programs: Switch between different programs
Applications
Educational Projects
- STEM Learning: Science, technology, engineering, math
- Programming Education: Learn coding with immediate feedback
- Electronics Basics: Understand sensors and actuators
- Creative Projects: Art, music, and interactive installations
Maker Projects
- Wearable Electronics: Fashion and costume integration
- Home Automation: Smart home sensors and controls
- Robotics: Brain for robotic projects
- IoT Devices: Internet-connected sensors and actuators
Professional Use
- Rapid Prototyping: Quick concept development
- Educational Tools: Teaching aids and demonstrations
- Art Installations: Interactive art and exhibits
- Product Development: Proof-of-concept development
Power Management
Power Sources
- USB Power: 5V from micro USB connector
- Battery Power: 3.7V LiPo or 3xAAA battery pack
- Auto-Switching: Automatically selects power source
- JST Connector: Standard battery connector
Power Consumption
- Active Mode: Varies by program and LED usage
- Sleep Modes: Low-power modes available
- NeoPixel Control: Significant power when LEDs active
- Sensor Power: Minimal additional current
Getting Started
MakeCode Setup
- Open Browser: Go to makecode.adafruit.com
- Select Board: Choose Circuit Playground Express
- Drag Blocks: Create program with visual blocks
- Download: Save .uf2 file to board
- Test: Program runs immediately
CircuitPython Setup
- Install CircuitPython: Download and install firmware
- Connect USB: Board appears as CIRCUITPY drive
- Edit Code: Modify code.py file
- Save: Code runs automatically on save
- Use REPL: Interactive Python shell
Arduino Setup
- Install Arduino IDE: Download latest version
- Add Board Package: Install Adafruit SAMD boards
- Select Board: Choose “Adafruit Circuit Playground Express”
- Install Libraries: Add Circuit Playground library
- Upload Code: Compile and upload sketches
Advanced Features
Infrared Communication
- Remote Control: Receive and transmit IR signals
- Device Control: Control TVs, stereos, etc.
- Communication: Send data between boards
- Proximity Sensing: Detect nearby objects
Audio Processing
- Sound Analysis: Analyze microphone input
- Music Generation: Create tones and melodies
- Voice Control: Simple voice recognition
- Audio Effects: Process and modify sounds
Motion Detection
- Orientation: Detect board orientation
- Tap Detection: Respond to taps and knocks
- Free-fall: Detect when board is dropped
- Activity: Monitor movement and activity
Package Contents
- 1x Circuit Playground Express board
- Pre-loaded CircuitPython firmware
- Getting started documentation
- Access to online resources and tutorials
Important Notes
- Multiple Programming: Can switch between different programming environments
- 3.3V Logic: All I/O operates at 3.3V levels
- File System: CircuitPython mode shows board as USB drive
- Bootloader: Double-click reset for bootloader mode
- Community: Large community with extensive resources
Advantages
- Versatile Programming: Multiple programming options for different skill levels
- Rich Hardware: Comprehensive sensor and output collection
- Educational: Perfect for learning electronics and programming
- No Soldering: Alligator clips eliminate soldering requirements
- Rapid Development: Quick prototyping and iteration
Limitations
- 3.3V Only: Requires level shifting for 5V devices
- Limited GPIO: Only 8 general-purpose I/O pins
- Power Consumption: NeoPixels can consume significant power
- Size Constraints: Round form factor limits some applications
- Cost: More expensive than basic microcontrollers
Recommended Accessories
- Alligator clip test leads for connections
- 3xAAA battery pack for portable power
- USB cable for programming and power
- Sensors and actuators for expansion
- Breadboard and components for advanced projects