Important NoteThis entire repo was AI created - including all of the data within. The intent was to A) help me with my personal electronics inventory; and B) see how I could use AI to make that process a bit easier. DO NOT TRUST!
Circuit Playground Proto Gizmo - Bolt-on Perma-Proto
Overview
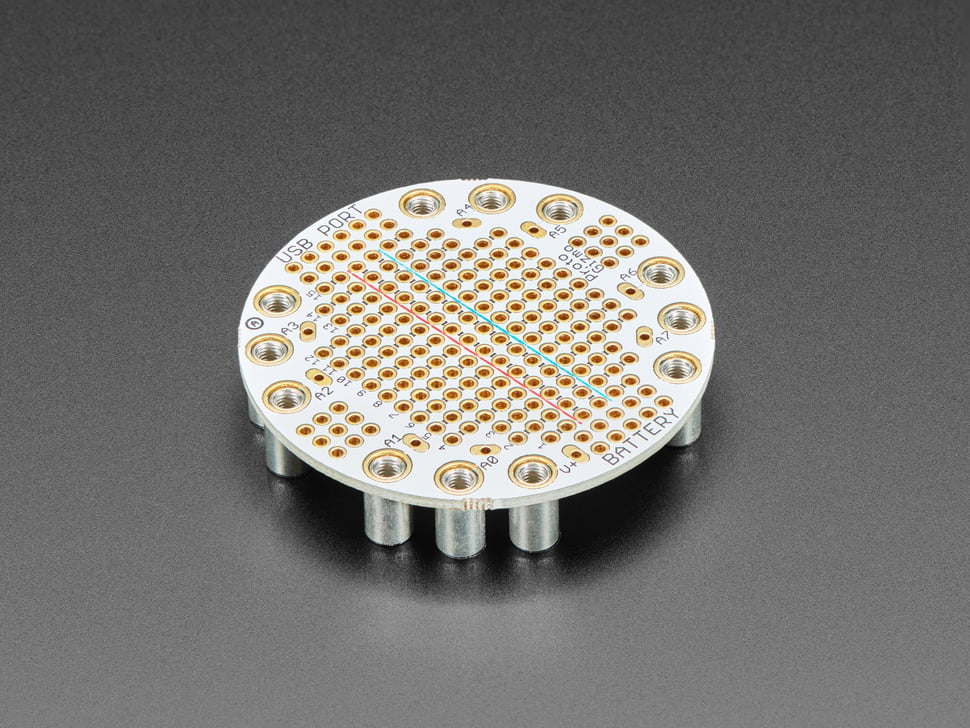
Extend and expand your Circuit Playground projects with a bolt-on Perma-Proto that lets you connect solderable circuits in a sturdy and reliable fashion. This PCB looks just like a solderless breadboard but has permanently affixed M3 standoffs that act as mechanical and electrical connections. Solder to the gold-plated traces to create your custom invention!
Specifications
- Outer Diameter: ~50.6mm / ~2.0”
- Weight: 17.8g
- Standoff Height: 8mm (as of Nov 8, 2019)
- Material: FR4 PCB with gold-plated traces
- Mounting: M3 threaded standoffs
Key Features
Breadboard-Style Layout
- Familiar Pattern: Standard breadboard trace layout
- Gold-Plated Traces: High-quality, corrosion-resistant connections
- Oval Pads: Large connection pads for each Circuit Playground pin
- Power Rails: Dedicated 3.3V (red) and Ground (blue) rails
- Side Groups: Black-marked connection groups in center area
Mechanical Design
- Bolt-On: Secure mechanical connection to Circuit Playground
- M3 Standoffs: Pre-soldered 8mm standoffs for proper spacing
- Removable: Can be attached and detached multiple times
- Battery Clearance: 8mm height provides room for battery underneath
- Stable Platform: Rigid connection for reliable circuits
Circuit Playground Compatibility
- Universal Fit: Works with Classic, Express, and Bluefruit
- Pin Mapping: Oval pad markings match Express/Bluefruit naming
- Power Access: Direct access to 3.3V and ground rails
- Signal Access: All GPIO pins accessible via large oval pads
Circuit Layout
Power Distribution
- 3.3V Rail: Red-marked power rail in center
- Ground Rail: Blue-marked ground rail in center
- Multiple Access: Power available at multiple points
- Low Resistance: Direct connection to Circuit Playground power
Signal Connections
- Oval Pads: Large pads for each Circuit Playground pin
- Clear Labeling: Pin names marked on PCB
- Easy Access: Convenient soldering points
- Reliable Connection: Secure electrical and mechanical connection
Prototyping Area
- Breadboard Pattern: Standard 0.1” spacing
- Side Groups: Connected groups for component placement
- Flexible Layout: Accommodate various circuit designs
- Ample Space: Plenty of room for components and connections
Applications
Circuit Development
- Permanent Prototypes: Move from breadboard to permanent circuit
- Sensor Integration: Add external sensors and interfaces
- Driver Circuits: Motor drivers, relay controls, amplifiers
- Signal Conditioning: Analog signal processing circuits
Educational Projects
- Electronics Learning: Hands-on soldering and circuit building
- STEM Education: Practical electronics education
- Project Development: Prototype to finished project progression
- Skill Building: Soldering and circuit design practice
Professional Use
- Product Development: Rapid prototyping platform
- Custom Interfaces: Specialized input/output circuits
- System Integration: Connect Circuit Playground to larger systems
- Testing Platforms: Create test fixtures and jigs
Assembly Process
Preparation
- Plan Circuit: Design circuit layout before soldering
- Gather Components: Collect all required parts
- Test on Breadboard: Verify circuit function first
- Prepare Tools: Soldering iron, solder, flux, etc.
Installation
- Attach Gizmo: Bolt onto Circuit Playground with included screws
- Test Connections: Verify mechanical and electrical connections
- Plan Component Placement: Layout components before soldering
- Solder Components: Install components and make connections
Best Practices
- Start Simple: Begin with basic circuits
- Test Incrementally: Test each section as you build
- Use IC Sockets: For expensive or removable components
- Document Design: Keep schematic and notes
Tools Required
Soldering Equipment
- Soldering Iron: 25-40W temperature-controlled iron
- Solder: 60/40 or lead-free solder
- Flux: Rosin flux for clean joints
- Desoldering Tools: Wick or pump for corrections
Assembly Tools
- Wire Strippers: For hookup wire preparation
- Needle-Nose Pliers: Component placement and bending
- Diagonal Cutters: Trimming component leads
- Multimeter: Testing connections and troubleshooting
Components
- Electronic Components: Resistors, capacitors, ICs, etc.
- Hookup Wire: 22-26 AWG solid or stranded wire
- IC Sockets: For removable integrated circuits
- Headers: Pin headers for modular connections
Design Guidelines
Circuit Planning
- Schematic First: Always draw schematic before building
- Component Placement: Plan optimal component locations
- Wire Routing: Minimize wire crossings and lengths
- Power Distribution: Ensure adequate power routing
Soldering Tips
- Clean Iron: Keep soldering iron tip clean and tinned
- Proper Temperature: Use appropriate temperature for components
- Good Joints: Create shiny, solid solder joints
- Avoid Bridges: Prevent solder bridges between pads
Troubleshooting
- Visual Inspection: Check for obvious problems
- Continuity Testing: Verify connections with multimeter
- Power Testing: Check power distribution
- Signal Tracing: Follow signal paths for problems
Package Contents
- 1x Circuit Playground Proto Gizmo PCB
- 12x M3 screws for attachment
- Pre-soldered M3 standoffs (8mm height)
- Documentation and getting started guide
Important Notes
- Standoff Height: 8mm standoffs provide clearance for battery
- Pin Compatibility: Markings match Express/Bluefruit pin names
- Reusable: Can be attached/detached multiple times
- No Components: Electronic components sold separately
- Soldering Required: Assembly requires soldering skills
Advantages
- Permanent Circuits: More reliable than breadboards
- Professional Appearance: Clean, finished look
- Secure Connection: Mechanical and electrical stability
- Reusable Platform: Can be used for multiple projects
- Educational Value: Teaches soldering and circuit construction
Limitations
- Soldering Required: Not suitable for beginners without soldering experience
- Single Use Circuit: Difficult to modify once assembled
- Component Cost: Additional cost for electronic components
- Size Constraints: Limited by Circuit Playground form factor
- Fixed Layout: Breadboard pattern may not suit all designs
Recommended Accessories
- Soldering iron and solder for assembly
- Electronic components for circuit building
- Hookup wire for connections
- IC sockets for removable components
- Multimeter for testing and troubleshooting